Category - Training

How Long Does It Take To Learn To Drive?

CalendarSomeone found the blog on the search term “what are the chances of passing your test in three months?”

The short answer: DVSA statistics show that the average UK learner takes 46 hours of lessons with an instructor, and 20 or more hours of private practice. Without getting into any arguments over that just yet, let’s assume for the purposes of this discussion that you will need 46 hours.

If you take a single one hour lesson a week, it’s going to take you 46 weeks to get to test standard. If you take two hours of lessons a week, it’ll take 23 weeks. If you take four hours of lessons a week, it’ll take you about 13 weeks. That’s around a year, six months, or three months respectively.

The longer answer:  For all sorts of reasons, an individual could end up taking far fewer or many more than 46 hours to get to the required standard. That DVSA figure is an average measured from real people taking real tests. It’s not a forecast, though it can be useful as a rough pointer.

Over the years, I’ve had two pupils manage passes in well under 20 hours, many who have done it with between 20-35 hours, and several who have taken well over 60. I can recall two who took 140 hours and 160 hours, and a recent one who did 120 hours spread over more than three years. I also know one who took 100 hours in a manual car with me, then a further 100 hours or more in an automatic, before finally passing on her seventh attempt (she’s since given up driving because she crashed the car almost every time she left her driveway – three times in the first fortnight after she got it).

I explain all this to my pupils who have never driven before, and suggest they think in terms of 30 hours plus to start with, then see how things go. I also point out that if they are typical, it will probably take around 4 months if they’re doing an average of two hours of lessons a week. I explain clearly that this is not a prediction or target, but merely a guideline based on past experience, and if it turns out they can do it it 10 hours, I’ll be as happy as they are about it.

Now, 30 hours – taking two hours of lessons per week – would just about squeeze into a three month window with a bit of tweaking here and there. If it was going to take 40 hours, you can add another month to that time frame. On the other hand, if you’re in the 30 hour bracket and did three of four hours a week, passing within six weeks would be feasible.

The reality: You simply don’t know how many hours you’re going to need until you’ve taken them. However, once you start lessons you can usually get a good idea of where you are on the curve within a couple of hours. Obviously, if you have previously taken lessons – possibly even getting close to test standard – then you’ll probably already be a long way towards your goal. On the flipside of that, If you’ve only got previous experience driving overseas, you may find that you are only marginally ahead of a beginner when you start in the UK.

If you’re on the wrong side of the curve – for whatever reason – you’ll need more hours than someone who isn’t. It doesn’t mean there’s anything wrong with you – it’s just the way it is.

You can’t be a Marvel Superhero just because you want to be, so picking a preferred number of hours and expecting to pass if your learning ability points to a higher number being required isn’t going to work. I had one early last year who declared after his tenth hour that he was now test ready. I asked him if he’d always only ever planned to take just ten lessons, and he said yes. He’d never told me that, and we parted company at that point. He was nowhere near test standard, and the last I heard was that six months later his mum was still teaching him.

People in general seem to have major problems understanding averages, distributions, and how biology works. So I stress again that DVSA’s statistics show that the majority of people take about 46 hours of lessons with an instructor. It doesn’t matter that your best mate Kyle was taught by his mum, or that he told you he passed “after 8 hours”. He was almost certainly lying or very confused over that figure (I’ve had them before where they are already good drivers, but the skills were picked up in stolen cars or driving illegally, and they don’t include that in their public declarations of Superheroism). And in any case, you are not Kyle and are probably not being taught by his mum.

Just remember: the average learner in the UK takes around 46 hours and some private practice to get to test standard. Some take a lot less, and some take a lot more, thanks to Mother Nature.

The Emergency Stop

I wrote this article in 2013 after I’d seen someone desperately trying to complicate the subject by claiming that the Emergency Stop isn’t in DT1 (the examiners’ internal guidance document). Just for the record, that document contains the following section:

1.31 EMERGENCY STOP

An emergency stop should be carried out on one third of tests chosen at random. It can normally be carried out at any time during the test; but the emergency stop exercise MUST be carried out safely where road and traffic conditions are suitable. If an emergency has already arisen naturally during the test this special exercise is not required; in such cases the candidate should be told and a note made on the DL25.

With the vehicle at rest the examiner should explain to the candidate that they will shortly be tested in stopping the vehicle in an emergency, as quickly and safely as possible.

The warning to stop the vehicle will be the audible signal “Stop!” together with a simultaneous visual signal given by the examiner raising the right hand to face level, or in the case of a left hand drive vehicle, raising the left hand. This should be demonstrated.

The examiner should explain to the candidate that they will be looking over their shoulder to make sure it is safe to carry out the exercise, and that they should not pre-empt the signal by suddenly stopping when the examiner looks round, but should wait for the proper signal to be given. To minimise the risk of premature braking, examiners are advised to ask the candidate if they understand the ES instructions.

The emergency stop must not be given on a busy road or where danger to following or other traffic may arise.

It is essential that examiners take direct rear observation to ensure that it is perfectly safe to carry out the exercise. They must not rely on the mirrors.

If the exercise cannot be given within a reasonable time the candidate should be asked to pull up, care being taken to choose the right moment as the candidate will have been expecting the emergency stop signal and may react accordingly. They should then be advised that the exercise will be given later and that they will be warned again beforehand. Alternatively, if conditions ahead are expected to be favourable, they should be reminded that the exercise will be given shortly, and the instructions repeated if necessary.

If a candidate asks whether they should give an arm signal, they should be told that the command to stop will be given only when it appears that no danger will arise as a result of a sudden stop, but that they should assume that an extreme emergency has arisen and demonstrate the action they would take in such a case.

The emergency stop exercise must not be used to avoid a dangerous situation.

It’s worth pointing out a few things that worry learners, all of which are mentioned above or in the rest of DT1:

  • you will not be asked to do it on a busy road
  • the examiner will check behind first, so you don’t have to
  • having to do it in a real situation could count as having done it on the test – the examiner will tell you
  • it will not be done as part of Independent Driving

Furthermore, DT1 adds:

ABS – Anti-lock braking system.

Note: Anti-lock braking systems (ABS) are being fitted to an increasing number of vehicles. Examiners should not enquire if a vehicle presented for a test is fitted with ABS.

Most ABS systems require the clutch and footbrake to be depressed harshly at the same time to brake in an emergency situation; therefore a fault should not be recorded purely for using this technique with a vehicle fitted with ABS on the emergency stop exercise. On the emergency stop exercise, under severe braking, tyre or other noise may be heard, this does not necessarily mean the wheels have locked and are skidding. Examiners should bear these points in mind when assessing the candidate’s control during this exercise. Further advice regarding ABS is given in the DVSA publication ‘driving the essential skills’.

I’ve mentioned ABS and the Emergency Stop before because of people trying to complicate it simply as a result of their own lack of understanding. I’ll repeat what I said in that article: when it says to press the brake and clutch at the same time, it doesn’t specifically mean that both feet must go down as if they were glued together at the ankles. The thing you have to remember is that the clutch will begin to release as soon as you start to press the pedal, and the brakes will start to bite as soon as you start to press them. Neither are digital switches – they are analogue devices, which means that there is significant travel of the pedals to achieve varying amounts of the relevant effect. So if the clutch releases more than the brakes are braking, the car will take longer to stop because the effect of engine braking is removed. For that reason, you really want to be braking hard first, then depressing the clutch a fraction of a second later when executing an emergency stop. The whole process happens in less than a couple of seconds anyway.

It still amounts to pressing both pedals “at the same time”, but this distinction relates back to the older method of cadence braking (on non-ABS cars), where you had to pump the brakes and slow down in stages, THEN put the clutch down right at the end to avoid stalling. In this case, you were not pressing both pedals at the same time, and doing so would most likely have been a serious fault on someone’s test.

Trust me, if your mum walks out in front of you and you need to do an emergency stop to avoid hitting her by a hair’s breadth, not utilising engine braking properly could make all the difference between a big sigh of relief or a trip to the hospital.

It doesn’t matter if the ABS kicks in (and makes a noise outside, with vibration on the brake pedal inside) during the exercise. As long as the driver is in control and stops the car promptly then the Emergency Stop will have been completed satisfactorily.

The Emergency Stop will nearly always be carried out as a totally separate exercise on the test, though if you have had to do one in a real situation (possible but highly unlikely for most candidates) then the examiner may count that as having done the exercise if you were one of one in three who gets it. For the exercise proper, the examiner will ask you to pull over and he will then explain as follows (again, taken from DT1):

Pull up on the left please (either specify location or use normal stop wordings) Shortly I shall ask you to carry out an emergency stop. When I give this signal, (simultaneously demonstrate, and say) ‘Stop’, I’d like you to stop as quickly and as safely as possible. Before giving the signal I shall look round to make sure it is safe, but please wait for my signal before doing the exercise.

Do you understand the instructions?

Once you have completed your Emergency Stop, he will say something along the lines of:

Thank you. I will not ask you to do that exercise again. Drive on when you are ready.

It’s that simple. And the decision over what is and isn’t acceptable lies with the examiner.

What would be a minor (driver) or serious fault on this manoeuvre?

The procedure as I teach it is as follows (immediately after the STOP command):

  • brake firmly
  • declutch just after
  • keep both hands on the steering wheel
  • once stopped, apply handbrake
  • put into neutral
  • look all around
  • relax

Then, once the instruction to drive on is given:

  • put into gear
  • gas/bite ready
  • look all around
  • if safe, release handbrake and drive off

Possible driver (minor) faults might include stalling, going for the gear lever or handbrake before the car stops, or not looking all around properly after you’ve stopped (though that last one is rare).

Possible serious faults might include getting into a mess/panic if you stall, not stopping quickly enough, putting the clutch down before the brake, or not looking all around at all before you move off (this is more common).

Some faults might be only minor in some cases, but become serious if other traffic is around. For example, stalling before you move off and not checking all around again. Or if stalling/panicking causes a hold up for traffic. Or moving off before you’ve looked around properly and someone is overtaking you. The examiner’s decision is what counts because every situation is different.

If you do it right – or even close to being right – on your lessons you’re almost certainly not going to fail your test over it. I’ve never had anyone fail for it. So make sure that you can do it right on your lessons.

Will I fail if I stall on the emergency stop?

No, you shouldn’t if you react appropriately by making the car safe, then get it started again promptly. It will usually be marked as a driver fault. However, you are on test and you might panic and do something else wrong which could result in you failing.

Do I have to pull over when I do the emergency stop?

No. That would defeat the purpose. The idea is to stop as quickly as possible, whilst maintaining control and safety. If you waste time trying to pull over you’ll travel further, and so won’t stop quickly enough.

Imagine your brother or sister (or pet dog or cat) runs out a few metres in front of you while you’re driving along. That’s why you want to stop as quickly as possible, and to hell with what’s going on behind you (the examiner will check to make sure it’s safe by looking behind – you don’t have to).

Once the exercise is complete, you will drive on normally unless the examiner specifically asks you to pull over – which he might, since pulling over then driving off again is a separate thing that is being assessed on your test.

Should I signal when I move off after an emergency stop?

In most cases it isn’t necessary, and you certainly don’t want to be doing it before you’ve looked to see if anyone might benefit. However, if you look around and decide that you should signal – for a pedestrian perhaps, or if someone is coming towards you from either direction – then do it (make sure you signal right and not left).

Why shouldn’t I use the handbrake to stop?

Depending on how old you are, you may remember from certain action movies that the characters involved in car chases sometimes brake, skid the car around, then drive off the other way. What they are doing is called “a handbrake turn”.

The handbrake usually only operates on the rear wheels, and if you are driving along and pull it sharply it can lock the wheels, and that causes them to skid. Since only the back wheels lock, the rear of the car spins around because for all practical purposes the rear wheels are not gripping the road surface.

It’s all well and good if you’re doing a stunt for a movie shoot, but on roads where there are other road users it is incredibly dangerous. Imagine an emergency situation, where you need to stop as quickly as possible, and usually in a straight line. You aren’t going to achieve that if the rear wheels spin out and are not gripping the road surface. At best, you’ll stop over a much longer distance because the handbrake isn’t designed to stop the car in the first place. At the worst, the car will spin out of control and you might hit something or someone – or even roll it.

On top of that, the ABS on modern vehicles functions via the footbrake (which is hydraulically controlled through the car’s on-board computer), not via the handbrake. In a handbrake stop you have no ABS functionality (the electronic handbrakes in modern cars usually won’t operate when you’re moving anyway).

If you apply the handbrake before the car has stopped in the Emergency Stop exercise you’re almost certainly going to get a serious fault for it.

Can you stop using the handbrake in any other situation?

The classic example is if your normal brakes fail for some reason – you press the footbrake and nothing happens. Your only option is to slow down and stop using the handbrake (noting the comment above about electronic handbrakes not working when you’re moving).

It happened to me many years ago when I’d flushed my brake system, but left an air lock in it somewhere. I came to a T-junction and the car wouldn’t stop, so I used the handbrake to slow it down. Fortunately no one was coming, because I couldn’t stop in time for the junction, but I did prevent the car ending up in someone’s living room!

I’m an ADI. How should I teach the Emergency Stop?

You really ought to know this. It isn’t rocket science. What I do is run through skids and how to deal with them, the factors likely to cause them, and so on. I have a few stories about when unexpected things have happened to me (like the time I was in a column of traffic driving at 60mph in the Cotswolds and a herd of deer ran out about 5 metres in front of the van at the front, who slammed into them because he couldn’t do anything). Then I explain the Emergency Stop procedure, which is basically as follows:

  • I give the signal
  • You brake hard, then put the clutch down – IN THAT ORDER
  • Put the handbrake on and put it in neutral
  • Look all around

When I (or the examiner) says to drive on:

  • Put it in gear and get ready to move off
  • Look all around
  • If it’s clear, release the handbrake and drive off

Looking all around – and that includes both blind spots – before you move off is critical because traffic or pedestrians could be passing either side of you. If you just glance in your mirrors after you’ve stopped you tend to get away with it, but if you try that as you drive off then it’s pretty much a fail. No guarantees, of course, but if you look properly it won’t be an issue.

“Locking the wheels is always a danger in an emergency stop. A vehicle fitted with abs requires the driver to do what?”

This one keeps coming up as a search term used to find the blog – pretty much the exact same words every time. I suspect someone somewhere is copying a question from their training materials to research the answer.

It is explained in this separate article.

I like to feel as though the ABS is about to kick in when a pupil stops. If the ABS does kick in a little, even better. But I don’t want them stamping hard on the pedal.

Emergency Stop and ABS

This article was originally written in 2011 after someone asked if it is OK for the ABS to kick in when you do the emergency stop on your test (and in real life).

DT1 – DVSA’s Internal Guidance Document – says:

ABS – Anti-lock braking system.

Note: Anti-lock braking systems (ABS) are being fitted to an increasing number of vehicles. Examiners should not enquire if a vehicle presented for a test is fitted with ABS.

Most ABS systems require the clutch and footbrake to be depressed harshly at the same time to brake in an emergency situation; therefore a fault should not be recorded purely for using this technique with a vehicle fitted with ABS on the emergency stop exercise. On the emergency stop exercise, under severe braking, tyre or other noise may be heard, this does not necessarily mean the wheels have locked and are skidding. Examiners should bear these points in mind when assessing the candidate’s control during this exercise. Further advice regarding ABS is given in the DVSA publication ‘driving the essential skills’.

Driving: The Essential Skills (TES) says this concerning ABS systems:

…You should refer to the owner’s handbook for details of the manufacturer’s recommended method of use…

More on what TES says about emergency braking later. Let’s take a look at some typical (and common) owner’s handbooks.

Vauxhall Corsa

For optimum braking, keep the brake pedal fully depressed throughout the braking process, despite the fact that the pedal is pulsating. Do not reduce the pressure on the pedal.

Do not let this special safety feature tempt you into taking risks when driving.

Traffic safety can only be achieved by adopting a responsible driving style.

Vauxhall Astra

Antilock brake system (ABS) prevents the wheels from locking.

ABS starts to regulate brake pressure as soon as a wheel shows a tendency to lock. The vehicle remains steerable, even during hard braking.

ABS control is made apparent through a pulse in the brake pedal and the noise of the regulation process.

For optimum braking, keep the brake pedal fully depressed throughout the braking process, despite the fact that the pedal is pulsating. Do not reduce the pressure on the pedal.

Ford Focus

Using ABS

When hard braking is required, apply continuous force on the brake pedal. Do not pump the brake pedal since this will reduce the effectiveness of the ABS and will increase your vehicle’s stopping distance. The ABS will be activated immediately, allowing you to retain steering control during hard braking and on slippery surfaces. However, the ABS does not decrease stopping distance.

Ford Fiesta

Using ABS

When hard braking is required, apply continuous force on the brake pedal. Do not pump the brake pedal since this will reduce the effectiveness of the ABS and will increase your vehicle’s stopping distance. The ABS will be activated immediately, allowing you to retain steering control during hard braking and on slippery surfaces. However, the ABS does not decrease stopping distance.

The message is quite clear: LET ABS DO THE WORK, AND DON’T TRY TO OVERRIDE IT.

Whether the ABS kicks in or not is down to many factors. A controlled stop that won’t engage the ABS in dry conditions on a clean and level surface will almost certainly engage it in the wet on a slight declination. Even on the flat, a bit of dust or gravel will change the physics completely. And on snow or ice, the ABS will kick in as soon as you touch the brake whether you want it to or not. It’s up to the examiner at the time to decide if the stop was prompt enough to be labelled as satisfactory.

If the test candidate stamps on the brake with all their might, causes the examiner to head butt the roof, and scuds to a halt over less than a metre from speed of 30mph, then the examiner just might consider it to be “not controlled”. But the ABS kicking in short of this is not a fault in any way.

TES goes into more detail after having advised checking the car’s owner’s manual. It deals with the issue on the premise that the ABS should be allowed to do the work.

How do you do the emergency stop?

At the prompt (when the examiner says “STOP” and raises his hand; or when in real life – for example – that woman with the pushchair walks out in front of you):

  • brake firmly and progressively (i.e. apply more and more pressure) to stop in the shortest distance safely
  • put the clutch down just after you brake
  • keep your bloody hands on the steering wheel up to this point!
  • once you’ve stopped, apply the handbrake and put it in neutral
  • take a look around and rest your feet

In reality, you’ll brake hard and declutch very soon afterwards – almost (but not quite) simultaneously. There’s no messing about with stopwatches and stuff! You just do it. But what things are classed as potentially serious faults during the stop?

  • responding too slowly
  • putting the clutch down before the brake
  • putting the handbrake on before you’ve stopped
  • skidding out of control
  • missing the brake pedal
  • taking your hands off the steering wheel

Notice how “stalling” isn’t on there. As long as you put the handbrake on and put it in neutral if you stall, then restart the engine, you shouldn’t worry – but obviously, don’t stall deliberately. Learn to do it properly.

Putting the clutch down too soon can cause the car to surge forward if you’re going downhill (on the level, it’ll simply not slow down), then the brakes have to do more work. This results in longer stopping distances. Make sure your method allows the brakes to engage before the clutch is disengaged.

When moving off – when told to do so by the examiner – get it in gear, get ready, and look all around. That’s over BOTH SHOULDERS and the mirrors. You can fail for not looking around properly before driving away.

Just to summarise one more time, though:

  • when that woman with the baby in the pushchair walks out in front of you after you pass your test, you will hit the brakes as hard as possible to avoid hitting her
  • you won’t give a flying toss whether the ABS kicks in or not – because you don’t need to
  • you want to stop over the shortest distance, so don’t put the clutch down before the brake
  • on your test, the examiner wants to see you demonstrate this simple skill by stopping quickly and in control when he tells you to
  • there is a big difference between doing it on test and doing in real life (e.g. to avoid the woman with the pushchair)
  • if your car has ABS, it is there to help you. Let it!
  • DVSA says you should do it this way
  • your vehicle handbook almost certainly says to do it this way (check!)
  • if someone is telling you otherwise, they are telling you wrong

Does ABS kick in if you hit the brake hard?

Not automatically – or rather, not as an immediate result of hitting the brake pedal. ABS kicks in when the wheels are locked, and allows them to move slightly. By hitting the brakes hard, if the wheels lock – and the car starts to skid – then ABS will kick in. However, if you hit the brakes just as hard and the car stops without skidding then the ABS will not kick in.

It is locked wheels which trigger the ABS, not the act of braking by itself.

Should I put the clutch down at the same time as the brake?

The blog has been getting hits from www.pistonheads.com (hi guys) as a result of a thread asking precisely this. As DVSA guidelines say, doing so is not automatically a fault – but it depends.

The problem with wording stems from the older method of cadence braking (on non-ABS vehicles), where you had to pump the brake pedal and slow down in stages, then put the clutch down at the end to avoid stalling. In this older situation, you did not “press both pedals at the same time”. The thing you have to remember is that the clutch will begin to release as soon as you start to press the pedal, and the brakes will start to bite as soon as you start to press them. Neither are digital switches – they are analogue devices, which means that there is significant travel of the pedals to achieve varying amounts of the relevant effect. So if the clutch releases more than the brakes are braking, the car will take longer to stop because the effect of engine braking is removed. For that reason, you really want to be braking hard first, then depressing the clutch a fraction of a second later when executing an emergency stop in a car which has ABS.

If you put the clutch down first, the car will free-wheel (or surge forward if going downhill), and the brakes will subsequently have to do all the work (and a lot more of it!). At the very least, you’ll stop over a longer distance, and that is no good for the woman with the pushchair you were reacting to. We can easily say that you must not de-clutch first.

If you hit the clutch and brake at exactly the same time it is highly likely that you will release the clutch plates before the brakes have started to grip significantly – and it will vary from car to car depending on clutch wear and pedal adjustment. In a panic situation this could easily lead to a longer stop.

So, common sense would suggest that you brake first, and then de-clutch (as per the advice in TES). This makes sure the brakes are starting to act before engine braking is lost by separating the clutch plates. Unless your vehicle handbook says otherwise, leave de-clutching for as long as possible to increase the amount of engine braking available during the braking phase.

The simple solution as far as training new drivers goes is to teach them to brake firmly, then put the clutch down. During an actual stop the two operations happen so quickly that they are virtually simultaneous anyway – but not so simultaneous that de-clutching affects the braking operation.

As long as the brakes have purchase, de-clutching will not attract a fault from an examiner if a satisfactory controlled stop is effected.

It’s easier for pupils to press both pedals simultaneously

I don’t teach my own pupils necessarily what’s “easiest” for them. I teach them what’s “best” or “safest”. Every single one of them has been able to do it the way I want them to after a few tries. Every single one. It is not a complicated process.

If you think “easiest” is better than “safest”, you need to have a word with yourself.

Do you fail if the ABS kicks in?

No. DVSA doesn’t say that anywhere. They will not fail someone just because the ABS engages during a controlled stop.

Do learners find the emergency stop difficult when taught “the DVSA way”?

No. To start with, there is no “DVSA way”. It makes perfect sense to brake first then de-clutch a fraction of a second later, and it’s the easiest thing in the world for most people to learn. DVSA’s TES is simply highlighting the best way.

Why not teach people to brake and de-clutch at the same time?

The method in TES says to brake first and de-clutch later. As long as this doesn’t go against the manufacturer’s recommendations (as DVSA correctly points out) then it is the best method. There is absolutely nothing wrong with the method outlined in TES. Furthermore, I have yet to see any manufacturer advise simultaneous braking/de-clutching – when they say to press the pedals at the same time, they just mean not to use the old cadence braking method.

The biggest danger of simultaneous pedal-dipping is that the clutch gets released before the brakes take hold. Obviously, this is extremely dangerous to the point of being potentially fatal if it causes you to stop over a longer distance.

How do you engage the ABS in an emergency stop?

The ABS is something that engages when it needs to. You don’t set out to make it operate. It will kick in if the wheels start to lock making it possible to maintain some steering control during the stop. When stopping in an emergency you simply brake as hard as you need to and if that causes the ABS to kick in then you just let it do its job.

The driving test only tests stopping in a straight line, but that’s not like the real world.

So what? The driving test emergency stop is making sure you can hit the brakes hard enough to stop, and do it in such a way that you stop in the shortest distance. It’s not testing you on every imaginable situation.

The bottom line is that if someone runs out just in front of you you’re going to hit the brakes and try as hard as possible to not hit them. On a bend, the risk of spinning off the road when braking hard at speed is extremely high. There’s nothing anyone can do about that – it’s the laws of physics.

DVSA is deliberately vague about how to do an emergency stop.

Nonsense. TES is a DVSA publication and it has two full pages of information about stopping in an emergency ,covering defensive driving and avoidance, ABS, and the basic routine itself. What exactly do you expect them to say?

What happens when the ABS kicks in?

Once the electronics under the bonnet detect the wheels have locked (i.e. that you’re skidding), they will release-brake-release very rapidly for you. The footbrake pedal will vibrate and you may hear a noise that sounds like you’re skidding on gravel. Just let the ABS do its job and don’t release the pressure on the brake (unless it is to help you recover from a serious skid, where the car is starting to swing out dangerously).

Is it safe to drive my [insert car name] when the ABS warning light is on?

Someone found the blog with “Ford Fiesta” inserted into the blank space.

At the very least, if the ABS isn’t working, then it won’t kick in if you have to stop suddenly, and that could result in someone dying where they might otherwise have been unharmed, since you’re more likely to skid and lose control. More relevant is the fact that since your car would fail the MoT test if the ABS is faulty, so if you were involved in an accident there is a strong possibility that your vehicle would be assessed as unroadworthy, and you could get in serious trouble.

If ABS is fitted to your car, it must work. If it doesn’t, then technically you’re breaking the Law. A faulty ABS means the brakes will still work, but the ABS won’t. So no, it isn’t “safe”.

Colwick Roundabout And Lane Discipline

One of the most common reasons pupils fail their tests is by not maintaining lane discipline on roundabouts.

I’ve noticed over the years that – from time to time – you get instructors who have read a few pages out of Roadcraft, and who have subsequently decided they’re going to teach their pupils to drive like police pursuit drivers from now on. It quickly develops into the inevitable boasting about how they get theirs to straight-line roundabouts.

Frankly, it’s a stupid idea to do that with 17-year old novices. When they’re under pressure, most of them are barely aware that there even any lanes there when they enter a roundabout, and even the normal observations and control are likely to suffer. With the additional checks needed if you’re going to skip lanes, the chances of something going wrong just increase. Furthermore, straight-lining is intended to allow police drivers to maintain speed, and that’s pretty much the last thing you should be encouraging 17-year olds to do.

I vividly remember an end-of-test debrief some years ago for a pupil who had failed with one serious fault. It occurred on the Virgin roundabout in Colwick, which basically has a two-lane dual carriageway going in, and two lanes coming out (therefore, two lanes on it, even though it is unmarked, and on the return to the test centre these are narrow). The examiner’s words were as follows:

I asked you to follow the road ahead at the roundabout. You approached it in the left-hand lane, and you straight-lined it – which is perfectly OK – but you didn’t check your mirrors to see if there was anyone in the lane to your right.

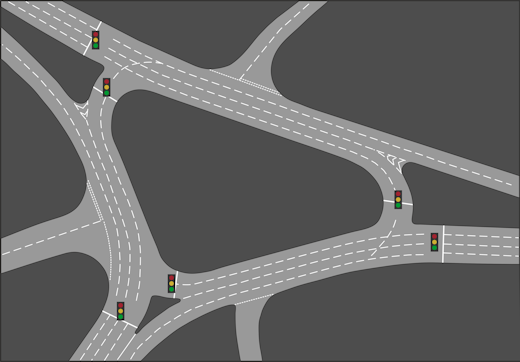
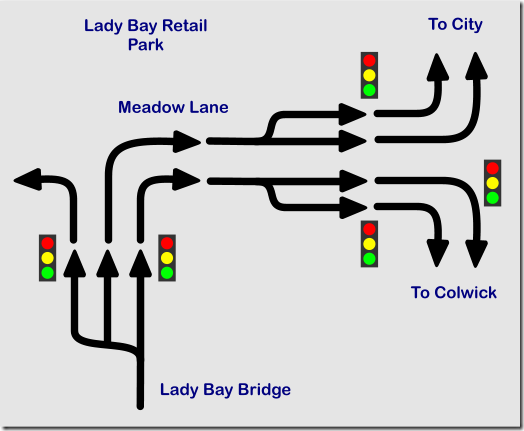
Lane directions shown as lines for Lady Bay Bridge and Colwick Roundabout

I have never forgotten that, and I use it on my lessons frequently. However, the pupil in question (and many others since when we’ve been dealing with roundabouts) didn’t have a clue what the examiner was talking about. At the precise moment it happened, he was thinking of a hundred other things. He knew, of course, that there were lanes, but when it came to do it – with the pressure of the test and all the stuff that happens inside people’s heads when they’re on a roundabout in that situation – he didn’t. That’s how it is for most learners, and if instructors are skimming over that to play with the big boys’ toys in Roadcraft, they’re doing those pupils a disservice.

I teach all of mine that staying in lane is the best policy, and they can play at being smart arses once they’ve passed and gained more experience around the nutcases infesting the roads these days. If nothing else, learning to stay in lane is a solid foundation on which to build your later skills – it’s a stepping stone to driving like a smart arse, if you like. If you’ve never been taught to maintain good lane discipline, but you have been shown advanced (and often pointless, for normal drivers) techniques that develop out of it, sooner or later you’re going to have trouble. And your driving test is an excellent place for that trouble to make itself known.

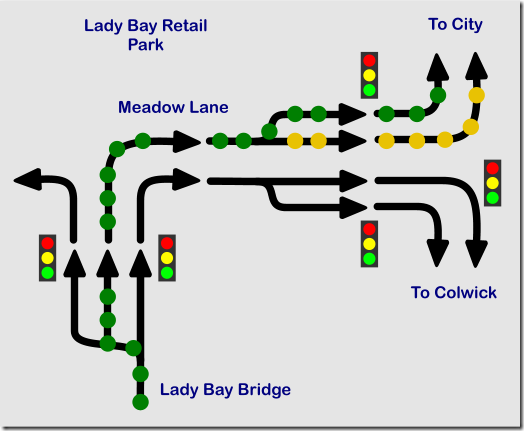
Lady Bay lanes shown as lines with routes to City

How an instructor teaches roundabout lane discipline varies from pupil to pupil. Some will pick it up quickly with no problems at all, but getting it over to others can be a huge challenge.

I used to have a big notebook of plain paper (nowadays I use a DoogleBook), and I frequently do sketches of roundabouts (and other things) to get the point I’m trying to make across. Sometimes, you get pupils who simply don’t get diagrams, and you have to resort to words and analogies with things they are familiar with (which can be a pain these days, as an increasing number of them appear to have absolutely no outside interests you can draw upon).

I also use graphics I have produced and laminated, like the ones above (these days I can sketch them in a few moments on my DoogleBook). The arrow diagrams show how the lanes on the approach from one direction to the main Colwick roundabout work, and which ones you’d use depending on where you are going. The one at the top is an accurate representation of the same roundabout with lane markings (click it to see the full sized version), and I have these for all the tricky roundabouts – not just the test ones. It means we can pull over and discuss what happened, and what ought to have happened.

As I have explained in the article about roundabouts, they nearly all work along the same basic principles, no matter how big and apparently complex they are. Even the largest can be broken down into a series of smaller parts that work exactly the same way as they do on smaller ones. Knowing how to do the smaller parts allows you to piece them together like a jigsaw puzzle when applying them on different roundabouts.

When it comes down to it, any large problem is just a collection of smaller ones. So as you learn, you learn to solve each small problem on its own, and over time put the pieces together so that you end up with an overall solution.

The Lights Are On, But No One Is Home: II

You’ve got to laugh.

A PDI (trainee instructor) asks for advice on whether it’s best to go it alone in his Part 3 training, or use a franchise to go on a pink licence.

He gets a reply that franchises are a waste of money and he should go it alone using Facebook. Except that the person who left that reply started out with a franchise themselves and left after becoming established.

Apart from the overlap of situations (a PDI aiming for Part 3 is a completely different situation to a new ADI who’s just passed Part 3), it’s like if Andy Murray started advising people to enter Wimbledon when they’ve only just taken up tennis on the basis that he’s won it in the past.

Actually, given the aforementioned overlap of situations, it’s more like Andy Murray advising someone who’s only just taken up cricket to enter the World Snooker Championship because he’s won Wimbledon before.

Anything to have a dig at franchises.

Wing Mirror Position + Usage

Wing Mirror PositionThis article was originally published in 2011, with updates in 2014 and 2016. It has had a few hits recently, so I’ve updated it again.

Someone found the blog on the search term “adi how to check wing mirror position”. A bit of a strange question if it was from an ADI, but for pupils it is often a problem – certainly to start with.

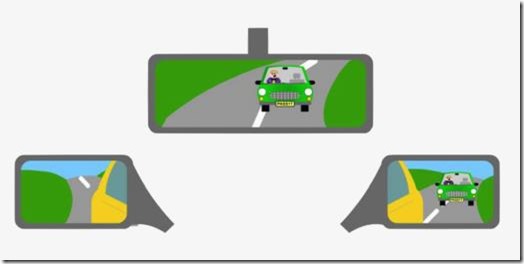
The wing mirrors should be adjusted to give the maximum view behind without creating blind spots. My own lesson plans use the image shown on here. However, this is not intended to provide millimetre-perfect guides for where to put the mirrors!

The bottom line is that you aren’t interested seeing birds and aeroplanes, or road kill. You want to see as much as possible of what is happening behind you and to your sides. You don’t want to be looking at half of your own car. It isn’t rocket science.

I currently teach in a Ford Focus and I’ve found that a good position position for the wing mirrors from the pupil’s position in the driving seat is when they can just see the tip of the front door handle in the extreme bottom right of the nearside mirror, and the extreme bottom left of the offside mirror. Anywhere near that position is fine – it doesn’t have to be measured with a ruler! Obviously, if you’re an ADI using a different car, you set the mirrors yourself and then look for a reference you can explain to your pupils when they have to do it.

One point I do stress to my learners is that if they plan on using the mirrors for any reversing manoeuvres, it makes sense to adjust them consistently each time they get in the car (during their cockpit drill). If they don’t, what they see can vary, leading to confusion.

An ADI needs to have a rough idea of what the best mirror position looks like from the passenger seat so they know if the pupil is doing things properly. This is pretty much down to experience, because all pupils are different – some sit 4 feet behind the steering wheel because they’re 6′ 7″ tall, whereas others sit only a few centimetres away because they’re 4′ 10″. Consequently, the best mirror position for each learner can vary dramatically.

I remember one occasion many years ago when one of my pupils had driven to a location for a manoeuvre. Just before we started it I casually glanced at her offside mirror and something struck me as being odd. I suddenly realised that I could see the side of the car in it from the passenger seat. When I tested the position later I confirmed that she would have been unable to see anything but the side of the car!

Lord knows what she was thinking, or what she thought she was seeing. She’d been through her cockpit drill and insisted everything was OK, and she was religiously doing the MSM routine throughout the lesson. But she wasn’t actually seeing anything useful at all. This is the sort of thing that instructors need to look out for.

What is the correct position for my mirrors?

You want to see as much as possible of what’s going on behind you and to your side, and not leave any unnecessary blind spots.Blind Spots

The interior and exterior mirrors’ coverage overlaps behind the car, but there are areas where only one mirror provides useful information – and areas where none of them do (the blind spots). The red car in the diagram is in a blind spot, and would not be visible in any of the mirrors, so you’d have to turn to look over your shoulder to see it (this is a shoulder or blind spot check).

There is no advantage to being able to see birds and aeroplanes anymore than there is to being able to check out the squashed hedgehogs. And it goes without saying that the interior mirror is not for checking your hair and make-up.

How you achieve the correct mirror setting is really up to you, but it makes sense to have a consistent position so that you can see the same space around the car whenever you go out. If the mirrors are too high then you won’t see the lines when you’re reversing into bays, for example, but too low means you can’t see behind you properly when you’re driving, which can be a particular problem if the road undulates (i.e. it is hilly).

I get my pupils to use the door handles as references, as explained above. For the interior mirror, the driver wants to see all of the back window with a slight bias towards their left ear. But remember, this is just a very general guideline that I use – it isn’t written down anywhere that you have to use it.

How much of the car should I see in the passenger mirror?

Almost none of it – just the same as with the one on your side.

Although there is no rule that says they have to be set in a precise way, common sense dictates that the mirrors are there so that you can see what’s going on around you at ground level – not so you can stare at the side of your car. Therefore, you want to adjust them so that you can’t see much of the car at all, and not too much sky or road. Being consistent is a natural consequence of that.

Don’t try to adjust your mirrors too far outwards to try and cover your shoulder blind spots – you won’t be able to do it, and you’ll just create two more of blind spots behind the car. What you’re after is almost continuous coverage from the nearside mirror, through the interior mirror, and across to the offside mirror.

How can I adjust my mirrors to eliminate blind spots?

If you mean the blind spots you need to turn around for, you can’t – not with the standard mirrors fitted to the car, anyway.

The only way to cover your shoulder blind spots using mirrors is if you buy additional piggyback ones that fit on top of your existing mirror housing and which can be angled differently (or those round convex ones you stick on the surface of your existing mirrors. Such additional mirrors are often used by people who can’t turn around properly, or in cases where the driver cannot see behind properly due to the vehicle design. A lot of instructors also use them, but I am not in favour because pupils are unlikely to fit them to their own car, and they just promote laziness when it comes to being safe. I only use additional mirrors if I’m teaching someone with a disability which impedes turning around in the seat.

Unless you have a medical condition or some genuine reason for needing extra mirrors, you should not be looking for ways to avoid checking your blind spots properly. Turning around to look is absolute, but using a mirror is by proxy. A mirror is useful if there is absolutely no other way – but it is dangerous and lazy if the mirror replaces the absolute way needlessly.

My instructor told me the car should fill one third of the mirror each side

I’m sorry, but that is complete nonsense. As I said above, there is no absolutely correct mirror position, but there are plenty of absolutely wrong ones. What point is there in wasting a third of the mirror area just so you can look at the side of the car?  I’ve also heard similar nonsense about “two [or three] finger widths” of car being visible, which is also wrong.

Your mirrors are there to show what’s behind you. Adjust them so that they show a tiny sliver of the car, and not too much sky or road.

Can I re-adjust my mirrors for particular manoeuvres?

Yes. My own pupils only adjust it for the parallel park, because I have a method which accurately positions the car relative to the kerb, but I sometimes pick up new pupils who like to drop the mirrors for any reversing (quite a few used to do it when reversing around a corner). If it works for them I don’t try to change it, but if it doesn’t I get them to do it my way. For normal observations, the mirrors don’t need to be moved if they’re adjusted properly in the first place.

If my side mirrors aren’t adjusted properly will I have trouble with parallel parking?

It depends what method you’re using. In order to parallel park you need to know where the kerb is and to judge your position relative to it, so if you’re using your mirrors to determine that, you’ll have problems if the mirrors are badly adjusted, or if they’re adjusted differently each time you get in the car. 

This is true of any manoeuvre or situation where you use your mirrors – if they’re badly or inconsistently adjusted then you won’t be able to see what you ought to be able to.

Can I re-adjust my mirrors if I’m on my Part 2 (driving instructor) test?

Yes.

Can I ask the examiner to adjust my mirror for me?

If you have manually-adjustable mirrors, yes. The examiner will not refuse this request. The examiners’ SOP (DT1) says (or used to):

The candidate may ask the examiner to assist in adjusting the nearside door mirror before a manoeuvre. The examiner should not refuse this simple request, and assist the candidate as appropriate. The candidate should not have to lean across the examiner to adjust the mirror.

If you have electrically-operated mirrors, it is a non-issue since you can adjust them as necessary.

Would I fail if I touched (clipped) someone’s wing mirror?

If you mean clipping it with your wing mirror (or any other part of your car), almost certainly, yes! You could fail just for being too close to someone’s wing mirror, so clipping it would be even worse.

Like most things you can never be 100% certain that it would result in a fail – there might be extenuating circumstances – but in all normal cases it would mean that you were passing too closely, and that has its own box on the DL25 Marking Sheet. You’d get a serious or a dangerous fault for it depending on the actual situation.

I clipped someone’s mirror. Does it make me a bad driver?

Only if you keep doing it. Most people have done it at one time or another, but they learn from their mistakes.

If you actually break someone’s mirror, my advice is to let them know. Years ago, one of my pupils went into a narrow gap too fast, panicked when a bus also came through, and clipped someone’s wing mirror when he steered away. I can vividly remember seeing the glass from the other car’s wing mirror fly up as we went past. I pulled him over immediately, and ran back to the other car – which had someone in inside ready to drive away – and apologised profusely, got their phone number, and informed my insurance company right away. None of this crap about not admitting liability – we were at fault completely.

Who are you to tell people how to set their mirrors?

Yes, that question has been asked in those aggressive terms on more than one occasion (including on forums, where instructors are trying to score points off of each other).

The short answer is that that I’m a driving instructor, and one that knows what he’s talking about. If someone hasn’t done it before – and if they’re paying me to teach them – I will give them the correct guidance they need on all aspects of learning to drive. If your instructor isn’t helping you with stuff like this it is probably because he or she doesn’t know the answer, and he’s taught you not to know it either.

What am I checking for when I use the mirrors?

Anything or anyone that you might hit or inconvenience if you move off. The mirrors are only part of it – you also need to check your blind spots, which are those areas not covered by the mirrors.

How should I use the mirrors?

Generally, at least in pairs. Use your own common sense.

For example, if you’re parked on the left hand side of the road and want to move off, you would typically check your inside mirror, offside (right hand) mirror, and right shoulder blind spot to get the maximum amount of information about what is coming up behind you. However, if you were parked on the right hand side of the road then you’d check your inside and nearside (left hand) mirror, and your left shoulder blind spot.

In either of the above examples, if you’d seen pedestrians, children, people getting into cars in driveways, or anything else that could be relevant, then you may well decide to check your other mirror and blind spot as well.

Do I need to check them in any particular order?

Not really, but checking the inside, wing, and blind spot in that order makes the most sense in most cases. If a car is coming up from behind on a straight road it will initially be visible in the inside mirror. As it gets closer it will appear in both the inside and offside mirrors, then move to only the offside mirror. Finally, it will only be visible in your blind spot until it passes you. And in any case, what is in your blind spot is closest to you, so checking that last gives you the most up to date information to act upon.

However, if you know there is a hazard of some sort behind you – cyclists or pedestrians, for example – look in the mirror/blind spot most likely to tell you where it is and what it’s doing as well. You are not going to be marked on which order you check them in as long as your checks are meaningful.

Remember that it is your responsibility to check properly. In extreme cases it may even be prudent to stop and get out of the car. For example, what if you see a small child on a bike, or even a dog, which then disappears from view as you’re about to move off? Where are they? This is especially relevant if you are doing a reversing manoeuvre of some sort.

Should I do a six-point check?

Some instructors absolutely live for routines like this.

If you insist on doing it, as long as your checks mean you don’t move off when someone is behind you, then it doesn’t really matter. Just bear in mind that while you’re doing two/three of the six checks (which are not always necessary), things could be developing in the other three/four (which are). For that reason, I do not teach this silly routine.

Many years ago, I had a pupil who used to do it. She used to say “no one there, no one there, no one there, no one there, no one there, no one there” as she did it. On her test, which she passed, the examiner commented on it by saying quietly to me outside the car: “she’s not very mature, is she?”

The simple fact is that as long as you are certain it is safe to move off, and the examiner knows that you know, that’s all that matters. How you get that message across to him is up to you.

Is it OK if I check all the mirrors every time?

It depends. Although checking all three mirrors to pass a parked car, for example, isn’t a fault in itself, the extra delay that the unnecessary additional check creates could cause problems. The most likely one is that you’ll steer out later and you’ll therefore be looking away from the obstruction at the same time you’re getting close to it. One of the most common faults (and causes of test failure) is passing obstructions too closely.

It’s the same when moving off. If you add unnecessary additional checks, the first one becomes quite stale before you’ve finished the last. If you check your right mirror/blind spot first, someone could turn up while you’re looking needlessly to the left. If that happened – and you didn’t see them – you would probably fail.

If you are doing it because you’re trying to cover all the bases and make sure you don’t miss a check in front of the examiner, or religiously performing the Six-point Check Ritual, it’s the wrong way to go about it. Remember that learners tend to be quite slow with their checks in the first place, and extra ones make them even slower – sometimes, too slow.

If it’s because you used to ride a motorcycle, then as long as you’re aware it isn’t absolutely necessary every time in a car – and if no other problems result – then it doesn’t really matter.

Instructors shouldn’t really be encouraging unnecessary checks, though they shouldn’t be trying to stop it if no other issues are cropping up.

I failed my test for observation when moving off, but I did look over my shoulder

The examiner is watching you to make sure you take effective observations before moving off (and in other circumstances). Just looking isn’t enough. You have to actually see, too. That’s what is meant by “effective”.

Think about it. Looking in two mirrors and over your shoulder involves three head movements, but you could do this with your eyes closed and not see anything at all.

I once had someone on a lesson stop at a T-junction to emerge, look both ways, and then try to pull out in front of a bloody lorry which was less than 20 metres away approaching from the right. They had looked, but not seen.

The problem is that when people don’t appreciate why they’re looking or what they’re looking for, they won’t do it properly. In that case they may as well have their eyes shut for all the good their “checks” do.

The chances are that something similar to this is what happened on your test. Or perhaps the examiner wasn’t happy that you’d have seen something if it was coming (even if it wasn’t) because you didn’t look properly.

ADI Part 3 PST Marking Sheets

I haven’t updated this in a while, and I really should have.

I have been intrigued by the number of driving school websites carrying these sheets now – even to the extent that they carry the exact same scanning defects that are on the ones I generated. Coincidence? Or uncredited plagiarism? I’m seeing a lot of the latter these days.

Note that the article below is the original from 2014, and the download file is for the old PSTs if anyone still wants them for some reason.

The new Part 3 marking sheet can be downloaded here. There’s only one, and it is the official DVSA website, so it should always be up to date (or have a link to an up to date version).


The blog gets a lot of hits from people looking for the PST (ADI 26) marking sheets used on the Part 3 ADI test. In fact, this file has been downloaded many hundreds of times, yet I think less than PDF Downloadhalf a dozen people have bothered to say thank you (and some websites are carrying ones they’ve apparently pilfered from here, down to the same scanning defects, but not given credit for). It used to be very difficult to get hold of these from anywhere else, and given the graphics work I had to do to clean up the originals, I know that people have got them from here.

Click the PDF image to download the file. It contains all ten PSTs, and they’re full-sized, so you can print them out if you want to.

The PSTs are also given in the Driving Instructor’s Handbook, although much smaller. But you can see what’s on them at least – which is really all that matters.

Just one last word on the “thank you” thing (and the outright plagiarism some people are involved in). If you have anything like the same approach when you start teaching real pupils you may find you don’t stay in business very long.

The National Speed Limit

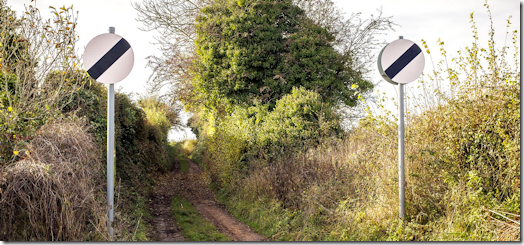
National speed limit on dirt trackOn lessons, it is quite common for pupils to query why there is a national speed limit in force in places where it is obviously not possible or safe to drive above about 30-40mph. One particular road around here is a single track with crude passing places on it (not the one shown in the photo above, but similar).
The history of the national speed limit (NSL) is quite interesting.

The first speed limits were introduced as long ago as 1865 for vehicles which were not powered by animals. A limit of 2mph in urban areas, and 4mph everywhere else, was in force, and someone with a red flag had to walk in front of the vehicle. The first speeding ticket was issued in 1896, when someone was assessed to be driving at 8mph in a residential area.

Obviously, the maximum speed capability of vehicles improved, and people were flouting the Law on a regular basis. So in 1903 the maximum speed limit was increased to 30mph.

By 1930, that speed limit was being ignored, too, and the Road Traffic Act got rid of speed limits completely. Of course, at that time, not many cars could go much above that anyway, so it wasn’t a problem for a while. However, the number of road deaths began to increase and in 1935 a 30mph limit was introduced in built-up areas, and that remains the case up to the present day. However, there were no limits anywhere else.

The first motorway appeared in 1958. Most cars could only manage up to about 50mph, so having no speed limit wasn’t much of a problem. But in 1964 – with motorways being the straightest and flattest roads available, and still unrestricted – the rally driver, Jack Sears, took a test car (a Cobra Coupe) on the M1 and got up to 185mph. The newspapers were all over it, citing it as dangerous driving, and debate still rages over whether he was to blame for the trial the following year of a 70mph limit on motorways, though the foggy winter and number of accidents it led to was probably a factor. In 1967, the 70mph limit became Law. It applied to all non-urban roads.

In 1973 there was a major oil crisis. To conserve fuel, the NSL was temporarily dropped to 50mph. This was lifted in early 1974. However, later that year, as part of a fuel conservation initiative, the NSL on non-motorway roads was reduced to 50mph. But in 1977, this was relaxed and the NSL on those roads went up to 60mph. The two NSLs were made permanent in 1978.

And that’s why we have the speed limits we have today.

How Long Does It Take To Learn To Drive?

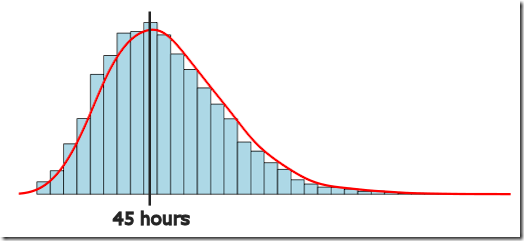
Normal DistributionThis question crops up repeatedly. It’s often the first question a pupil asks when they get in the car for the first time.
The official DVSA statistics say that the typical learner takes around 45 hours of lessons with an instructor, and 20 or more hours of private practice before they pass their test. As soon as this is mentioned, people who haven’t got a clue what statistics are start trotting out the usual crap and accuse DVSA of interfering in their job.

Look. There was a study a few years ago which asked a lot of new drivers how many hours they had had, and the result was an average of 45 hours plus at least 20 hours of private practice. You can’t alter the fact that that’s what happened: those drivers did have an average of 45 hours plus 20 hours of private practice prior to passing. Just because the word “statistics” is used, and you don’t understand them, doesn’t change that. It’s what did happen.

Try to understand what the word “average” means. If you have 100 people, and each one of them took between 20 and 100 hours to pass their tests, if you add up all the hours then divide by 100 you get “an average” number of hours. It doesn’t mean that every person took “the average”. It just means that was the middle-ish amount of hours taken. In the case of the DVSA study, that average number of hours turned out to be 45. This is a lot more reliable than saying how long it took your last pupil, who did it in less.

Of course, if each one of those hundred people took a different number of hours, ranging from 1 to 100, then the average wouldn’t tell you much. However, the likelihood – indeed, the reality – is that the majority of people would be clustered somewhere in the middle, with only outliers stretching off towards the extremities. It would be called “a distribution” – in statistical terms, a “normal distribution” – and if you plotted the numbers on a graph it would look something like the one shown above. This is a powerful and very useful tool, and it remains such even if you haven’t got a clue what it means. The DVSA study showed that 45 hours was the average that most people were clustered around.

When a new pupil gets in the car and asks how many hours they’ll need before you’ve even seen them drive, you need your head examining if you quote them a specific figure, and especially if it is from your last model pupil. However, explaining the above statistic in suitable terms will give them a rough idea, and illustrate clearly that they’re almost certainly not going to be ready by next Friday if they’ve never driven before.

I’ve mentioned before that the fastest learner I ever had went from zero to pass in 14½ hours over a couple of months. He was exceptional, though, and it is worth also noting that he must have done at least five times that number of hours as private practice. I rarely come across anyone as dedicated as he was. Some years before him, another pupil managed the same in 17½ hours. She, too, did a lot of private practice when she went home between terms, though she took over a year to learn. Then there was another one, who did it in 23 hours. He was unusual inasmuch as he didn’t do any private practice at all. I’ve had a fair number manage it between 25 and 30 hours, and a huge number between 30 and 50 hours. These are first time passes I’m referring to, and some did private practice, whereas some didn’t.

At the other end of the scale, I taught one woman for over 100 hours until I finally persuaded her to switch to automatic (I’d been trying that since around the 40 hour mark). She never had a test with me, and she then took at least another 100 hours of automatic lessons, and finally passed on her seventh attempt. She’s since given up driving, after wrecking her car bit by bit over the course of the first fortnight she had it.

Another took 160 hours and three attempts before passing (his brother tells me he has had numerous minor bumps). More recently, another passed on his fourth attempt after 133 hours over more than three years. I’ve had a few I can recall with around 60 or 70 hours, and not all of them had issues like those others. One in particular nearly passed with a single driver fault on his first test – until he nudged the barrier at the Colwick Test Centre when he parked at the end – and then took a further 7 attempts (if I recall) to pass, with regular lessons in between. He was a good driver, but the number of hours he took was disproportionately high.

I’ve never bothered to sit down and work it out properly, but my average is somewhere between 25 and 45 hours. That’s the range most of my pupils are in. The overall skew is towards the lower end of the range, since those taking a large number of lessons are fewer than those who manage the much shorter numbers. It’s statistics again.

With all that in mind, when anyone asks, I simply tell them that the national average is apparently 45 hours with as much private practice as possible, but that I’ve had people do it in as little as under 20 hours, and as much as 200 – though those were exceptional cases. I explain that everyone is different, and you only know how many hours it will take after you’ve taken them. I explain that it is best to think in the 30-40 hour range to begin with – but if we can do it quicker, we will. I tell them that it is impossible to predict how many hours they will need at the outset, but we’ll get a better idea as their lessons progress.

If they don’t like that they can go elsewhere. Only a few ever have, but they were exclusively non-UK drivers who wanted to take a test immediately.

Driving Test Success Theory Test App

Driving Test SuccessThis post from 2013, but an update is long overdue.

Unless they already have an app, I advise all my pupils that the only thing they need to buy to prepare for their Theory Test is Driving Test Success 4-in1, published by Focus Multimedia (DTS). It is available for both Android and iPhone, and costs £4.99 at the time of writing. Sure, they can buy a book if they want, or use any other service of their choice, but this is the one I recommend.

For many years, DTS was available as a DVD, and I used to bulk buy them from an ADI supply company and sell them on to my pupils at cost (which was much less than the retail price). However, the days of the DVD are behind us and phone apps are almost universal. I’m not sure if they still do a DVD version.

I’m sticking my neck out here, but you can only realistically get access to the entire official revision question bank by paying someone some money – especially if you want a polished and reliable interface. Free apps might contain only a sample of questions from the full bank, or they don’t include the correct up-to-date questions (someone might be using the old question bank). DTS contains every official DVSA practise question in a clean interface, and it also comes with 85 Hazard perception Test (HPT) clips, including the excellent CGI ones. You also get an electronic copy of the Highway Code, and a Road Signs app.

The Theory Test app also has a voiceover feature, and it will read the questions and possible answers out loud to you. Remember that you can choose this option on your actual Theory Test if you need it, so it is a useful feature.

But there is a free version

Yes, and it only contains a small sample of questions and no HPT. Try it, by all means. But don’t think that you will pass if you just run through it a few times. It’s only £4.99 for the full app and HPT clips, so stop pissing around and buy it. The Theory Test costs £23, so risking failing it needlessly is false economy.

This is a true story. Not that long ago I had a pupil who I’d advised to download DTS. He failed his Theory Test several times, and after each one I was asking him how he was doing when he used the app. He assured me he was getting 100% in every test. After the next fail – and I can’t remember how many he had taken up to that point – I remember asking what app he was using. He told me it was DTS, but I asked how much he had paid for it. He replied “nothing. It was free”. I could have killed him – he was getting 100% by being asked the same ten or so questions every time!

Does DTS do voiceover?

Yes. You enable it in the settings, make sure your phone’s media volume is turned on/up, and it will then read out each question and answer automatically as you do tests on it. You can ask it to repeat as necessary.