Category - Food

How To Remove Label Glue

Drizzling OilRegular readers will know I do a bit of cooking when the fancy takes me. The kind of stuff I cook involves any, some, or all of Olive Oil, Extra Virgin Olive Oil, Peanut Oil, Sesame Oil, Rapeseed Oil, Sunflower Oil, light Soy Sauce, dark Soy Sauce, Worcestershire Sauce, and several others.

Recently, and to simplify my use of my ingredients, I bought a pack of those long-necked ‘oil’ dispensers with silicone ‘corks’. They fit in any bottle as long as it isn’t too wide at the neck, and they work like a charm. But with the lockdown and everything, my usual source of cooking ingredients has moved online, and that means usually getting smaller bottles than I’d buy at the cash & carry or the Asian supermarkets. Typically, I buy 1L bottles of Soy, for example, but online the brand I use is only half that.

You can buy oil dispenser bottles, of course, but these too are often very small, and they’re not made of strong glass in many cases. Others are opaque and made out of porcelain, so you can’t see how much is in there, and come is silly shapes for some reason. They also cost a small fortune – more than a pack of ten dispenser nozzles if you want a decent one.

Anyway, my dad finished off a bottle of his rum and I decided to use the bottle for one of my oils. I needed to get the labels off, so I soaked it in hot water for a couple of hours, then scraped off most of the paper. Then I soaked it for a few hours more and got the rest of the paper off. And I was left with every bit of glue that was originally on there stuck firmly on the bottle (along with the RFID chip). Nothing would get it off – even that Glue Gone stuff that is supposed to shift label glue. Even scraping it with a penknife just moved it around (though that’s how I got rid of the RFID, albeit in tiny pieces).

Then I had an idea. Sodium Bicarbonate is supposed to be a miracle cleaner, so I made a 50:50 paste of Sodium Bicarbonate (aka Baking Soda) and regular cooking oil, painted it all over the glue, and left it to stand for about an hour. The oil kept it in place. Then, using the scouring side of one of those foam kitchen sponges and a little bit of Fairy Liquid and warm tap water, it just scoured straight off!

So there you go. To get rid of stubborn label glue, you need to make a paste of equal parts of Sodium Bicarbonate and oil, paint or dab it over the glue, and let it stand for a while. With a little elbow grease after that, it should come right off.

Cashew Nuts and Poop Colour

Since I wrote this half way through 2017, it has been viewed 40,000 times! For the last year, it has been the top post. Obviously, a lot of people like Cashew nuts!

Before I start, let me state clearly that I am not a doctor, and this is not a medical assessment of any kind. But I can state absolutely and categorically that eating too many Cashews CAN send your poop white – or at least very pale or clay-coloured. In fact, eating too much of almost anything – and especially nuts (any type) and pulses – is likely to affect your poop’s colour and consistency.

I found this out after I had a shock one day. I won’t go into graphic detail, but let’s just say after I’d been for a Number Two, I almost did another when I saw what colour my poop was!

The internet is a great thing, but it can be very misleading if you’re not careful. I mean, you get a pimple, you look it up… cancer. You get a toothache and you look that up… cancer again. A headache? Yep, cancer – or possibly a stroke, a heart attack, cirrhosis of the liver, or mange. And so it goes on. And social media is even worse for bad information. It’s people who are the problem.

You’ll get someone who had a headache, so they Google it. Some online doctor (or one of your 100,000 ‘followers’) says it means you have a brain tumour, even though it was the fact you were hit over the head with a baseball bat that afternoon which prompted you to look it up in the first place. If you’re even half as crazy as your followers, you’ll now believe the online stuff and be convinced you have a tumour. And you’ll spread it around like you’re an expert for other people to find and be worried about. The baseball bat obviously caused some damage – but not what you’re now thinking.

In my case, I had done something sufficiently different from normal – namely, I made some salted, roasted Cashews (which are easy to whip up, and way cheaper than buying them ready made) and ate some. By “some”, it was actually more like half a kilo of them over a fairly short period of time. I like Cashews, and since I hadn’t had any for a while I suddenly got a hankering for some. They were nice, and I didn’t give it much thought until my stomach started rumbling an hour or two later.

When I Googled “stool colour and cashew nuts” I was surprised at how many results came up – mostly dire warnings about cancer and scrofula. There were also a lot of cases of people questioning their poop colour after eating Cashews. So many, in fact, that there was absolutely no way that there couldn’t be a connection.

So rest assured that if there is otherwise nothing wrong with you – and there probably isn’t – the answer is most definitely yes: eating too many Cashew nuts can turn your poop very pale, or even white. And other nuts and pulses can do the same sort of thing. Mine cleared up after a few hours. And I recently made some more salted Cashews – not eating as many this time – and my poop went pale again next morning.

Incidentally, I have also discovered that eating a lot of black grapes can give your poop a green tinge.

However, pale poop can be a sign of an underlying medical condition that requires the involvement of your GP, so if it doesn’t clear up inside a day or so, make an appointment.

Can eating a lot of Cashews affect a child’s poop/stool colour?

Yes. And it wouldn’t need anywhere near as many nuts as it would for it to affect an adult.

Can eating a lot of Walnuts affect your poop/stool colour?

Yes. From what I have read, eating a lot of any nut, pulse, and some dark-coloured fruits and vegetables can make your poop change colour. Green, very pale, even reddish/orange have been mentioned in the various sources I checked.

You need to be careful with red (and black) just in case it is due to blood in your poop rather than merely a pigmentation effect. If you see blood, get checked out by your GP.

Do Blueberries affect your poop colour?

Yes, they can make your poop green, reddish, or dark depending on how many you eat (and whatever else you’ve eaten). Be careful if your poop is genuinely red or black/very dark as this can sometimes mean there is blood present, which is potentially a serious issue and nothing to do with what you ate. If it persists, see your GP.

I ate nuts and there are bits in my poop

It’s normal. Things like peanuts and sweetcorn – things high in fibre or with tough skins – might not get broken down completely and may make it all the way through, ready to scare the living daylights out of you when you see it.

Do Cashews give you diarrhoea?

Not directly – unless you are allergic to them. However, eating too much of any nut can lead to diarrhoea or very loose stools, and that includes Cashews. It’s because of the fats and fibre in them.

As with any problem, if it lasts for more than a day, see your GP. And if you get proper diarrhoea every time you eat a few nuts, you might want to get that checked out, too, because you could have an allergy – and nut allergies are potentially quite serious.

Do Cashews make you go to the toilet more?

Probably. They contain a lot of fibre, and eating that does loosen your stools, so going to the loo will be necessary. It’s why people who are constipated are advised to eat more fibre. There’s a difference between loose stools and diarrhoea, though. 


IMPORTANT: this article does not constitute medical advice, and should not be taken as such. If any problem lasts more than a day, go and see your GP. If you ate Cashews and your poop went pale, it should clear up in a day or so. If it doesn’t, see your GP. And never ignore blood in your stools.

I Have Always Wanted A Potato Peeler

Lakeland Electric Potato PeelerSeriously. I’ve been thinking of getting an automatic potato peeler for years, but the fact that they’re usually industrial units for use by chip shops, matched by industrial prices, has put me off. Maybe not so much the price, but certainly the size.

I was browsing through the newsfeed tonight and came across this review. Lakeland is now selling an electric home potato peeler (or potato rumbler, as they’re called).

The review is somewhat lacking, because it doesn’t say anything about what happens to the peelings and how you wash them out, but I would imagine there’s a collection box or something (from Lakeland’s own description, the peel apparently stays in the main bowl, so you just rinse it out). Even so, it’s a very reasonable price, and can peel a kilo of potatoes in one go.

Lakeland has high street stores all over the country, but it’s available online from them. It looks like the days of my trusty OXO Good Grips peelers are numbered – at least as far as potatoes are concerned.

Baking Bread: Vollkornbrot (Sourdough Rye) – Part III

After the preamble in Part I, and the production of the Anstellgut in Part II, we’re now down to the serious business – making my first loaf of Vollkornbrot.

There will (eventually) be a few more pictures. The recipe I’m using is very simple, and is given below.

In a suitable bowl, beat the starter, salt, and water until frothy and well mixed. Add the flour and mix either by hand, or with a stand mixer. You just need to make sure everything is thoroughly combined – no need to knead or develop the gluten (there’s not much gluten in rye flour).

The mixed dough before rising
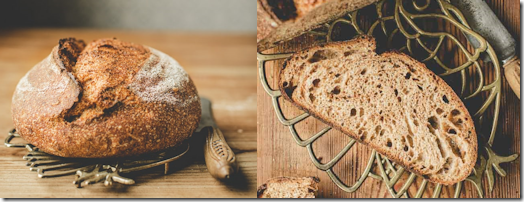
What you end up with can only be described as a sticky mess, but that’s OK because it’s exactly what it should look like. I’m glad I went with my Kenwood, because if you get any on you it sticks like all get out! Cover it with a tea towel and let it rise at room temperature  for 10-12 hours.

Turn it out on to a well-floured surface and shape it into a round. Mine had risen by more than twice its original volume, but was still as sticky as hell. The phrase ‘turn it out’ is a bit of an oversimplification, too – most of it fell out, but there was still a layer stuck in the bowl, so I scraped that out with a spatula. I tried flouring my hands to prevent it sticking when I was shaping it, but that was no good, and I’ve since discovered you need to wet your hands with cold water when handling rye dough.

Gently place the dough into a well-floured proofing basket (mine has a canvas liner).

After proving for 90 minutesLet it rise for 60-90 minutes uncovered, until cracks appear on the surface. Mine rose again noticeably during this time.

Preheat the oven to the highest temperature you can (Gas Mark 9). Place a pan of boiling water on the bottom shelf to provide steam. Flour the top of the loaf and gently tip it on to a baking tray (the canvas liner released it readily, which was a huge relief).

Tipped out and ready for bakingI put one shallow slash using a sharp knife through the dough’s ‘skin’ to be on the safe side, though it cracked by itself. Drop the oven setting to Gas Mark 8 (230°C) and put the loaf inside. Total baking time is 50 minutes.

After 20 minutes, remove the tray of water.

For the last 10 minutes, open the oven door a little – just slightly ajar.

My first VollkornbrotThis is what the result is straight out of the oven. It’s exactly what I was after – on the outside, at least. It’s identical to the authentic German loaves. And after letting it cool right down…

My first Vollkornbrot - slicedYes! Result. It has a nice tangy taste (which is one that you need to acquire, so be warned) and the crumb is pretty much just as I wanted it.

It’s amazing, really, that just 10g of the Anstellgut did all this. Many of the American recipes – and a lot of the British ones – use a tonne of the stuff. I guess that is to speed up the proofing time so it rises faster and (sigh) attempts to get ‘grape-sized holes’ – as I saw one American trying to do in a rye bread only last night – in the crumb. They also have complicated multi-stage processes which revel in terms you have to look up, but the one I found is as simple as you can get. And it works.

This long slow rise is authentically German, and it results in an even, dense, and authentic crumb.

When I make my next loaf (or subsequent loaves), I will add to the images here depending on how clean I can keep them looking (and as I hone my skills) so you can see the different stages.

Also, I was so desperate to cut into this one to see what it was like, it was still slightly warm. Apparently, you’re supposed to keep them for 24 hours before cutting into them, and I’ll do that in any future attempts.

What is ‘room temperature’?

Say, between 20°C and 25°C. If it’s less than that, it will rise much more slowly. I discovered that on the 2nd loaf, when we’d gone from around 20°C outside to less than 10°C, with indoor temperatures down pro rata.

How do you stop it sticking to your hands?

Cold water is definitely the answer. I initially tried flour, but it was no good at all. But running my hands under cold water, then quickly shaping the round and dropping it into the proofing basket was simple the second time. Just don’t go overboard with it.

My loaf has a dense or damp bottom

Assuming that it’s fully cooked, make sure you let it cool on a wire rack – not on a solid (and especially, a cold) surface. If the base cools too quickly, moisture in the loaf condenses, and that makes it denser or even soggy at the bottom.

Baking Bread: Vollkornbrot (Sourdough Rye) – Part II

VollkornbrotAfter my preamble in Part I, now it’s time to get down to business and start making my proper German Sourdough Rye Bread – Vollkornbrot in this case.

The whole point of sourdough bread is that you don’t use any added yeast – which is fortunate, since the panic-buyers have it all. Instead, you make use of the yeast that occurs naturally in the flour. The only problem with that is that there’s not much there compared with a tablespoon of pure bakers’ yeast, so you need to gradually bring it to life and let it grow before you can actually make any bread.

This is a one-time process, and at the end of it you have a ‘starter culture’ – or Anstellgut, in German. Incidentally, if any German readers want to correct me, please do. I’m trying to improve my German language skills right now, and having to translate these recipes has been fun, but that doesn’t necessarily mean I have got all the words right. Anstellgut in particular doesn’t translate too well – you get some pretty funky results – and I had to work it out for myself.

The principle behind making a starter is that you mix approximately equal portions of flour and water, then incubate it in a warm place for a day. Then you ‘feed’ it with more flour and a similar amount of water, and incubate again. You repeat this for several days, until at the end of it you have a nice frothy starter which is now fully active and can be used to make bread rise. You can use any flour to make a starter, but it is usually best (though not essential) to use the type of flour you’ll be making the bread out of later. In my case, I want a rye bread, so I am using rye flour.

I’m using “Roggenmehl Typ 1150”, which I purchased from Bäckerei George, located in Dresden, Germany. They’re on eBay, and the listing is in German, but you can use any rye flour if that worries you (and if you can get it). They delivered to me with no problems, so I’m happy to vouch for them. Roggenmehl means ‘rye flour’, and Roggenmehl 1150 (the number relates to the ash content) is high in B and E vitamins, contains at least 85% of the whole grain, and is therefore darker than normal bread flour. Rye has a lower gluten content than regular white flour and a slightly sour taste.

Googling for information on starters and sourdough throws up some bizarrely complicated methods which seem fixated on ending up with barely more than a thimbleful of starter from anything up to half a kilo of flour and the same amount of water. I went for a simple Anstellgut based on one I found on a German cookery website. It takes 7 days to prepare – assuming nothing goes wrong. I used a big enough container so as not to have to keep pissing about throwing half away here, and half away there to try and keep it in a jam jar (it rises and falls when you’re making it).

I started with a jam jar, then switched to a larger jar when the volume increased. Before use, I washed the jar I needed and then dried it in a low oven for 20  minutes to sterilise it. You can use a plastic container as long as it’s clean.

Oh, one more thing. Chlorine is very bad for the low levels of yeast spores in the flour, and it kills or inhibits them. Don’t use tap water when making your Anstellgut – use spring water from a bottle. And you can warm it slightly either in a clean pan on the stove, or in the microwave for a few seconds. Ideally, it should be around 25-30°C when you use it.

I was intending to show a series of pictures, but I quickly realised this is pointless. Once the Anstellgut kicks off, it rises then falls over 24 hours. So although it might double in volume a few hours after you feed it, after 24 hours it has calmed right back down and you can’t see anything dramatic.

Day 1

To the clean jam jar, add 50g of flour and 80g of slightly warm bottled spring water. Mix with a clean spatula, cover the jar with muslin, and incubate at about 25°C for 24 hours.

Day 2

There is already obvious activity even after 24 hours, with a few bubbles and a honeycombed texture when you dig into it. It has a very slight acidic odour. It’s looking good, so far.

Add 50g of flour and 60g of slightly warm water. Mix with a clean spatula, re-cover with muslin, and incubate for 24 hours.

Day 3

Sometime during the night, the marks on the jar show it doubled in volume, then fell back again. It is frothy with the same slightly acidic odour. I’ve transferred it to the larger jar now (I only just got away with it in the smaller one).

Add 50g of flour and 60g of slightly warm water. Mix with a clean spatula, re-cover with muslin, and incubate for 24 hours.

Day 4

Again, at some point overnight it doubled in volume and then fell back. It smells more yeasty now – almost like when making beer, but not as strong.

Add 50g of flour and 60g of slightly warm water. Mix with a clean spatula, re-cover with muslin, and incubate for 24 hours.

Day 5

Again, it doubled at some point, then fell back. The smell is still good.

Add 50g of flour and 60g of slightly warm water. Mix with a clean spatula, re-cover with muslin, and incubate for 24 hours.

Day 6

Once again, it doubled and fell back. I’m beginning to see how this works. Each feed, it becomes highly active with the new food, then quietens down once it has used it up.

Add 50g of flour and 60g of slightly warm water. Mix with a clean spatula, re-cover with muslin, and incubate for 24 hours.

Day 7

Once again, it doubled and fell back

Add 50g of flour and 60g of slightly warm water. Mix with a clean spatula, re-cover with muslin, and incubate for 24 hours.

Day 8

My Anstellgut – my baby (which has a name, by the way) – is ready to use (and that comes in Part III).

Maintaining the Anstellgut

If you’re baking regularly, feed the Anstellgut in exactly the same way as you did when you were making it. Equal amounts of flour and water daily if you’re keeping it at room temperature.

Storing the Anstellgut

If you’re not baking bread regularly, seal the lid, put the Anstellgut in the fridge, and feed it weekly. It will keep almost indefinitely.

Baking Bread: Vollkornbrot (Sourdough Rye) – Part I

VollkornbrotLike most of us, I have a lot of spare time on my hands right now, and regular readers will know that I like cooking, especially if it involves trying to copy something that already exists commercially, and which I enjoy eating.

Note: This is a three-part series – the fun stuff is in Parts II and III.

Before the lockdown, I rediscovered something I’ve missed for years – German Rye Bread. And I mean the proper sourdough rye – not Hovis or any other insipid ‘wholemeal’ concoction that’s just packet white bread with some brown dye in it.

Thinking back to whenever I travelled abroad with someone on business (even when I used to go on skiing trips with friends, for that matter), once we got there food was always a problem. There was always someone in the bloody group who would only want to eat burgers or pizza – and even that threw up issues if the burger wasn’t a McDonalds, and the fact that proper continental pizza is nothing like a Dominos or Pizza Hut affair.

‘Tough, we’re having Bratwurst and Sauerkraut’ tended not to go down too well, so there was little choice but to give in at least some of the time. You see, if I’m in France, I eat croissants, proper baguettes, and anything else French. And I love it. It’s the same if I’m in America, Pakistan (a bit risky), Switzerland, Spain, Austria, Italy, or Germany. I mean, what’s the point of being up in the Alps or The Dolomites, with the smell of wood fires and fresh coffee all around, and you’ve got to walk miles to the end of the village to get a bloody McDonalds (and Coke) for a fussy eater? One time, at a conference in Vienna with this guy (it was close to Christmas, with all the Christmas markets over there, to make matters worse), we’d agreed to alternate on who decided where we ate each evening. As the one of us who wasn’t afraid to look around and embarrass himself trying to speak German (I can, a bit), and who preferred continental beer to Fosters at the best of times, the first night I found a place where they didn’t speak any English, served brilliant Austrian food (Wiener schnitzel, strudel, spätzle, and so on), beer in Steins, and and which was where all the locals went to eat. Next night, the guy I was with wanted to go for a bloody Chinese! I was seething – we’re in Vienna, at Christmas, with all the Sachertorte and Apfelstrudel in those markets, and instead we’re eating Crispy bleeding Duck (he was being ‘adventurous’) in a plastic Chinese restaurant that was exactly the same as back home.

I’ve always had a soft spot for Germany, though, and the last few times I was there – while those I was with would grumble and gingerly poke at a bowl of non-British cornflakes with non-British milk (or maybe a croissant with non-British jam) for breakfast, in prelude to the nightly argument over whether we’d go for Schweinshaxe followed by Germknödel or a McDonalds that evening – I’d go for the full-on German option of scrambled eggs and a selection of different and often very dark breads, with various cooked meats, salamis, and cheeses. I fell in love with German bread more each time I went (as well as Germknödel). Incidentally, if ever you go to Hanover, look up The Bavarium restaurant – brilliant Gulaschsuppe and (sigh) Germknödel.

Anyway, back to the point. I had found proper German rye bread in Asda, of all places – made and packed over there. It was just rye bread, too, and not that poncey stuff with sunflower seeds, or nuts and raisins in it, and usually with a bloody rainbow on the wrapper somewhere. Nor did it specifically mention ‘for vegans and other weirdoes’ on the wrapper. It was just as I remembered, but being unfortunately situated on the special weirdo shelf in Asda’s bakery section, it was often sold out. As a result, I bought it when I could and froze it – being so dense, it freezes perfectly. Then came the lockdown, Asda doesn’t sell it online, nor can I find it anywhere else.

In the early stages of the lockdown it was impossible to get any bread from Asda at all thanks to the panic-buyers. My elderly parents only eat white bread and my dad, in particular, is a stubborn old sod and won’t accept that we need to make do with what we can actually get, rather than pick and choose what we want. My first thought was ‘Breadmaking Machine’, but I immediately discovered that the panic-buyers had cleared those off the shelves (and online). Then I realised they’d cleared out all the stocks of yeast and flour, too.

Things have calmed down a bit with Asda, though it’s still hit-and-miss, and getting white bread for my parents is somewhat easier. But I wanted German Rye, so out came my project hat, and off I went to resolve the issue.

Googling threw up a multitude of ‘authentic’ German recipes, all of which were as authentic as a Corsa with a BMW badge glued to it. Anything which contains ‘all-purpose flour’ is not authentic. It’s American. Any ‘sourdough’ recipe calling for ‘instant yeast’ is the same. And Americans seem to have this weird fascination with making bread with silly patterns on the crust, and the biggest imaginable holes in it so they can boast how much it has risen in multitudes of ‘rustic’ photographs. Yet this was all that kept coming up.

Then I realised what I was doing wrong, and fired up my trusty VPN to pretend I was in Germany. That did it! Stacks of German recipes, from Germany, and in German. Armed with my fluent (in my dreams) German linguistic skills – and Google Translate – I figured out how I was going make Vollkornbrot to begin with.

As I already implied, there must be thousands of nutcases all over the UK right now who are sitting on stockpiles of every type of flour, yeast, and electrical appliance that could even remotely be used in baking bread, without having a clue how to use any of them. But, when in Rome – or in the case of my VPN, Germany – I decided to order from German millers. So I now have 10kg of rye flour (Roggenmehl) and a couple of kg of coarse rye meal (Roggenschot). Roggen means ‘rye’, Mehl means ‘flour’, Roggenschot literally means ‘rye scrap’ or ‘rye flour’ (but coarsely ground), and Vollkornbrot means ‘whole grain bread’.

Sourdough (Sauerteig in German) bread doesn’t use any added yeast. Instead, you have a starter culture (Anstellgut), which utilises the natural yeasts present in the flour. To make one, you simply mix flour and water, and over a number of days gradually coax the yeast into becoming more and more active by adding more flour and water until it is at a level of activity where it can be used to give the necessary rise to your bread. As long as you keep feeding it, the starter lasts pretty much forever (some bakeries boast starters which are over 100 years old), and you only use a fraction of it each time you make bread. More about this in Part II.

Rye with fine crumbMy target is something with a tight crumb similar to this (the stuff I was buying from Asda). No stupid 3cm wide holes, and no Leonardo da Vinci crap on the crust. Just a dense rye bread.

Part II of this series will make the starter/Anstellgut, and Part III will be the baking of my first loaf of Vollkornbrot.

And trust me on this. It might seem like a lot of hassle, but it isn’t. Once you have your starter – which isn’t time consuming other than the day wait between stages – making bread is an absolute, laid-back doddle.

The Börner V5 Food Slicer – You Live And Learn!

Börner V5 SlicerI’ve had a Mandoline slicer for many years. I bought my old one after seeing an ad on TV, and it lasted for at least 20 years. In fact, there’s still not much wrong with it now, apart from the state of its box after all this time.

But – and being a sucker for these things, though in recent years I’ve tried to break the habit – I saw another ad on TV a few months ago for the Börner V5 Slicer. It was all shouty, as they usually are, but I thought to myself that the old one was about ready for replacing, so I took the plunge. Since I’ve had it, I’ve used it a few times for the usual things, but it wasn’t until tonight that I needed to dice some carrots.

Now, as anyone knows, dicing carrots is a major pain in the backside. They’re quite brittle, for one thing, and bits go everywhere. And seeing as they’re also quite hard, if you have a lot of dicing to do you’re likely to end up with blisters from holding the knife, and cuts if you don’t maintain concentration. And unless you take forever over it, the finished dice isn’t necessarily a ‘dice’ – it is more of a selection of trapezoidal things, and they’re not uniformly-sized trapezoidal things, either.

My old Mandoline couldn’t do this, but tonight I finally figured out how to do it on the Börner – though I have to admit I needed to study their demo video closely several times until it clicked in my head what was happening.

You see, if you use a normal home Mandoline with a slicing blade fitted, the short vertical blades create the strip cuts, and the main V-blade detaches them from the bulk. So you only get strips. The only way to dice, therefore, is to manually cut lengthways into whatever it is you’re dicing, then use the Mandoline with those cuts at 90° to the V-blade (or alternatively, cut strips and then dice them separately, which also tends towards trapezoidality (I made that word up) and is also a pain). It’s dangerous enough even with soft things like cucumbers, and you still have to be precise with your cuts if you want a uniform dice. With carrots – and their aforementioned physical properties – you’ve got no chance.

I was sitting here tonight thinking how the hell can a Mandoline be used to dice quickly when I decided to look at the Börner website. Sure enough, they say it can dice, but they don’t explain how. The video shows them doing it, but the only thing it mentions – and only then in passing – is that you alternately slice with 90° turns of the safety holder. For me, I needed to understand why. And then it clicked.

On the Börner, the slicing plates have two positions they can be moved to, and one of the positions clearly shows cubes. Here’s the secret: the cube (dice) position pushes the blade tips higher than the V-blade, so when you slice, the bulk item in the holder is pre-cut above the V-blade ready for the next slide, and when you turn the guard 90° for that slide, the next V-cut produces a dice, and another pre-cut is made for the next slide. So alternately slide-twist-slide-twist and so on gives you a uniform dice. My old one couldn’t do this, presumably for safety reasons, because if you use a Mandoline without using the safety holder you will lose parts of fingers at some point, and if the slicing blades can protrude higher, you’ll end up shredding the bits that are still attached to your hand. The Börner is German, and Germans are far more practical about such things, and probably feel as I do in that if you use the damned thing without the safety holder it serves you bloody right if you cut yourself. It’s certainly served me right all the times I used the old one without the guard and cut myself.

So now I can dice things quickly and precisely. And it only took 40 years to figure out how.

Eggs And Salmonella

Eggs snapping exotically in a pool of butterMost people will remember the Edwin Curry saga back in 1988, where she claimed that most eggs were contaminated with Salmonella. It led to a dramatic fall in egg sales (60%), and it destroyed her political career.

Ironically, there actually had been a Salmonella epidemic, even though the furore resulting from her comments sought to deny any problem.  The whole matter is quite complicated, and I won’t go into it here. But it wasn’t until about 2017 that the Food Standards Agency (FSA) finally announced that it was, after all, safe for “vulnerable people” (pregnant women and the elderly, in particular) to eat soft-boiled or runny eggs. It’s funny that even though there was “no problem” back in 1988, it took 30 years to officially come out and declare it in such a way that the implication was there had been a problem for all that time, but there you go.

In between times, it had been a case of yes/no/maybe when the question about the safety of eating eggs – especially soft-boiled or runny ones – cropped up.

I read an article somewhere in the last week that mentioned a Salmonella outbreak across several flocks (the difference between a “flock” and chickens in general is a highly complex and political situation in itself). But an FSA alert came through today warning people that British Lion Eggs (those are the ones that Brexiters believe have red, white, and blue yolks, and which play Land of Hope and Glory when you crack one) from Flock 1UK1187 with Best Before dates of 22, 23, and 24 September may be contaminated with Salmonella, and should be cooked thoroughly.

FSA emphasises that this affects a single flock code, but the story I saw suggested more might be affected, so I expect this one to escalate.

You Have To Laugh

I got an email tonight from the Food Standards Agency (I’m signed up to alerts). It’s amazing how many recalls are issued each week – they’re mostly for bits of plastic or salmonella contamination, though many are labelling issues where something in them isn’t declared on the label.

The one I received tonight was of the latter type. The Co-op is recalling something called a “Veg Taster”.

Because of “undeclared fish”!

I can’t find out what a “Veg Taster” is, and I’m certainly not going out to buy one. But the name suggests that it is suitable for vegetarians. They do “Fish Tasters” as well, and the undeclared fish in the FSA alert involves salmon, so you can sort of half guess how it happened.

Joking aside, though. It could be a problem for anyone with a fish allergy.

Mango Lassi

King of Mangoes - the AlphonsoMy love affair with mango lassi started some years ago, after I’d been to a concert in Leeds. I was driving my mate home, and we decided to stop off for a curry.

Now, usually when we go for a curry, we end up drinking large quantities of beer (when he comes to Nottingham, I get a taxi and he stops over). But I don’t drink when I’m driving, which I do when I go to Leeds, and in any case many of the restaurants in Leeds are not licensed. The one we chose at random (mainly because it was there, and open), wasn’t. So I ordered a mango lassi, which was served in a large jug. And it was bloody gorgeous.

As is my wont, I then decided I would make it at home. It’s actually very easy, and there’s no secret or technique. All you do is pour a 450g pot of plain yoghurt into a liquidiser, about the same amount of mango, about half that amount of milk, a tablespoon or so of honey, and a handful of ice cubes, then blitz it.

The only real issue in the UK is the mangoes. The ones you buy year round at the supermarket are mainly the green-red ones – I think they’re called “Alice” mangoes – and they’re usually not ripe so as to extend their shelf life. You can speed up the ripening by putting them in a paper bag with a banana, but that’s a pain in the arse because it can take a while. They still make a decent lassi, though. Alternatively, if you have a good local Indian or Pakistani supermarket, they usually have seasonal mangoes in stock, and they’re a darned sight cheaper than supermarket ones. The drawback here is in the word “seasonal” – decent mango varieties are only in season for a few months each year.

Recently, one of the online stores I buy stuff from sent out an email announcing that the new season’s mango harvest was in. So I duly ordered a couple of cases. I chose the best mango variety there is – the Alphonso.

The Alphonso is a smallish mango (compared to the Alice variety), with a yellow skin. When it is ripe, you can massage it carefully, which breaks up the flesh inside, then break off the stalk and suck the liquidised flesh out, which is apparently how they’re often eaten. The same technique makes extracting the pulp quite straightforward – you just squeeze it into a bowl and that’s it. Well, almost. Mangoes have a bloody big stone (seed, or pit) inside, and those stones are noted for the fact that it is almost impossible to hold one since they’re so slippery. The main issue for me is that some (quite a lot, actually) of the flesh is still attached to them, and you don’t want to waste it.

So anyway, after a lot of swearing as I tried to get all that extra pulp off the first two stones, I decided there must be a better way – especially since I had a couple of dozen to get through. I thought about it for a bit, then surmised that some sort of gentle friction would clean the stones of pulp, so I turned to my trusty Kenwood Chef. I put all the pulpy stones in the bowl, fitted the dough hook (I said dough hook – keep reading), and left it running on slow speed for about 30 minutes. It worked like a charm, and got all the pulp off.

Whatever you do, don’t use the K-blade. I’ve already tried that for you – you’re welcome, though you probably don’t realise it. I thought it would be quicker. However, whereas the dough hook doesn’t get anywhere near the sides of the bowl, the K-blade does, and due to the aforementioned slipperiness of the pulp-coated stones, if (or, when) one gets trapped between the bowl wall and the K-blade with a powerful motor behind it… well, let’s just say that it is messy, involves at least two T-shirts, and you don’t really want to go there. As I said, you’re welcome. The dough hook, though, just keeps hitting the stones and doesn’t trap them, and if you leave it long enough this removes all of the pulp.

I was planning to freeze the pulp in portions, but I don’t think it will last long enough to make that worthwhile now I’m on a lassi roll.