Category - DIY

Raspberry Pi ONVIF Camera Project – I

Update: I’ve changed my plans on this and will not be trying to construct a complete Ring-type doorbell after all. My experiments with CCTV cameras have shown I can build a suitable system without having to mess with the motion detection. I can let the camera do that.

Overview

I’ve been having problems with my birdbox camera. I’ve been having problems with my Ring doorbell. I’ve also been playing around with various CCTV cameras.

I’ll get on to the birdbox issue in a moment, since it is the primary subject of this article. But for general background:

  • my Ring Doorbell issue is to do with the fact that Ring is discontinuing the desktop app, which I can access instantly from my PC when I receive a proximity alert or a doorbell push to see who is there. Ring’s intended alternative is a web-based approach, which is slow, and which also requires you to log in via 2FA if you’re inactive for more than a few minutes – and by the time you have, whoever there is gone. So I formulated the idea of building my own video doorbell.
  • my CCTV interest developed from the Ring issue, and from learning a heck of a lot about IP camera networking from my birdbox camera, which gave me ideas for a home CCTV system.

Let’s not worry about how these all fit together in the history timeline of my mind, because I’m not sure myself! Right now, my birdbox camera is my main focus.

I installed a birdbox last year, fitted with a Wi-Fi HD camera. After some messing around to get a decent Wi-Fi signal to the end of the garden it worked brilliantly, and I got a night time resident roosting Great Tit within days of me putting it up. I had high hopes of a nesting situation come the Spring. Whenever the bird came in (and I will now refer to it as ‘she’, which will make sense shortly), she would often jump up behind the camera to pick off insects. That was no problem until the one time she did it and the signal disappeared, because she’d pulled the Wi-Fi antenna off the top of the camera.

I didn’t want to risk another Wi-Fi camera – my relationship with Wi-Fi is quite rocky at the best of times, and having a small bird disable it just added to that – so I decided to fit a wired one. After I’d put it in and run the network cables and PoE switches to the house, I had the video feed back. And as I’d noticed a lot of small twigs underneath the birdbox by the time I did that, I discovered she’d built a nest (when roosting over winter, she just settled on to the wooden floor). I was able to see the camera feed on my home network, and also able to stream the RTSP feed to the blog (and anyone else) so they could watch it live. It worked for about a week, and then the RTSP feed was lost – possibly a result of updating the camera firmware, or maybe because of a camera fault. I’m still pushing that side of things with the supplier, but at least I still have live access on my home network, as she has now laid eight eggs and is incubating them.

The problems with the camera set me off on my usual thought process, which amounts to this: well, OK. I can buy another one of those. But what if I made one myself?

In the case of a camera, and if it were based on something I had programmed myself, I would have full control over operation and repair. But what about the size of it? Those off-the-shelf birdbox cameras measure about 40mm x 40mm x 23mm, so there’s no benefit in building one the size of a refrigerator. But the Raspberry Pi Zero (a full computer) measures about 65mm x 35mm x 2mm, and a HD camera for it is even smaller, though it adds maybe another 5mm to the overall thickness. And I’ll cover this later, but a suitable add-on which gives PoE and wired networking capability adds a further 30mm to the thickness, so hardware-wise you could have a camera system which is only 65mm x 35mm x 40mm, and in a case perhaps 75mm x 80mm x 57mm (I already have one identified). That would fit in the birdbox easily and also give internal room for cables. The only issue from then on would be software.

The beauty of the Raspberry Pi is that people out there have already done brilliant things, and the software they produce is usually available for free. And software for creating ONVIF camera applications does exist.

However, many of those solutions have too wide a scope. In my case, I just want a raw ONVIF camera with no frills (other than a microphone, which might be problematic on a Pi), so I can get the fastest and highest quality image, then monitor it using Surveillance Station on my NAS. I can fiddle with motion detection – if I actually need it in my birdbox – within Surveillance Station. My approach is to keep things simple, and then build on that if I want bells and whistles later. But the DIY projects online try to put all the bells and whistles in right at the start, and many are likely to be superfluous to most people. Motion detection within the camera, which is one such popular feature, ramps up the processing overhead immediately.

This project will be similar to the Kneeling Chair one I did some years ago. I will add instalments as I go along. But right now I have several of these – the Pi Zero, cost £13.50:

Various images removed as the plan has now changed:

One of these – the PoE HAT, cost £22:

I have this on notify for when it becomes available – it’s an autofocus HD camera for the Pi (though the actual one I end up using might change), cost £23:

And this is the case I am likely to use, which all of the above will easily fit into – cost £25:

Obviously, I will need a few more bits and pieces – some of which I already have – and I haven’t mentioned IR Cut for night vision at this stage. However, I will detail those as I go along. And the worst part is always getting the finished product – building an ONVIF device will be relatively easy, but mounting it compactly in the case so it can be used in a practical setting will be the hardest task of all, since I will have to drill that case and then make sure it is still at least water resistant when I mount it Inside the birdbox. It won’t get wet in there, but it will be subjected to variations in temperature and humidity.

Update: Hold on. I just had another idea for the birdbox camera issue. I have discovered that even though a typical CCTV camera looks like a Danish salami, most of the inside is empty space and the camera assembly is a section at the front.

I just tested one I have strapped to my second birdbox and it works. So if I disassemble it and re-package it into a suitable case, I will have a ready-to-use birdbox camera with all the bells and whistles of a CCTV camera.
Windscreen Smearing When it Rains

Smearing windscreen in rain

The problem of smeared windscreens in the rain has driven me nuts ever since I started driving, but it became a major headache when I became a driving instructor.

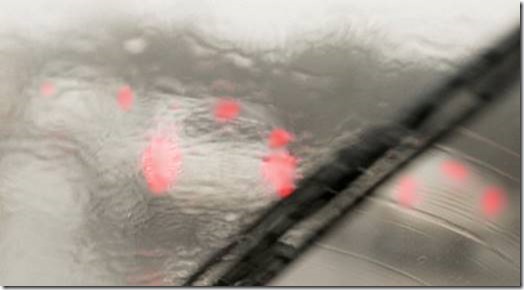
We’ve all experienced it. You get a few spots of rain, and when the wipers wipe you get a mosaic pattern left behind for a few seconds. In heavy rain it’s like someone poured chip fat on the screen and you can’t see properly.

Just to clarify, but there are two separate situations involved here. The normal everyday situation is that muck gets on to your windscreen, and you need to get it off. You do that by squirting some of your screen wash on to the glass, and the wipers wipe the muck away. I’ve talked about how to do that in the article about making your own screen wash. However, over time you get oil and wax bound to the screen which is very difficult to get off, and that is the second situation, and the subject of his article.

Things came to a head some years ago when my lease company replaced my car. From the first day I owned it, in rain you couldn’t see anything. All the previously tried methods, which had given various levels of success, failed completely. Scrunched up newspaper was no good, sodium lauryl sulphate had a minor effect, various solvents also minor, and Clearalex was probably the best but still far from perfect.

The problem was so bad that I seriously thought that the glass must have been damaged in some way.

Normal smearing is caused by gunk on the road loosely binding to the glass. All you need is a bit of water and detergent and it comes straight off. But wax is a totally different matter. A tiny amount of it can affect the entire surface of the glass, and is does not come off with normal detergents. In fact, the process of washing the car can be a major culprit – sponges and rags get wax on them from any waxing process you use, and if you go near the glass with them it gets on there, too. It’s even worse if you use hand car washes regularly (as I do).

The other thing to remember is that your wiper blades can also get wax on them. Even if you get your glass sparkling clean, a few wipes of contaminated blades can mess it up again almost immediately. Furthermore, if you clean the glass and the blades, but leave any wax in the well where the wipers sit, they pick it up and spread it around again.

That lease car – and several others since – appears to have had some manufacturing residue still on the glass, because I was also having problem inside with misting and hazy marks with certain sun angles.

So how can you get it off?

Clearalex is available as a liquid, but you used to be able to buy it in sachets in powder form. It is intended to be added to your screen wash, and it cleans quite well, but the drawback is that it leaves a horrible white residue when it dries. I have had some success with Sodium Lauryl Sulphate (SLS), which is an anionic surfactant used in many household products. It removes quite a lot of windscreen gunk, but it didn’t seem to touch wax or my residue, and it also leaves annoying white marks on the glass when it dries.

However, I eventually came across Sugar Soap. I’d not heard about it before, but it is used by decorators and builders to remove grease and dirt from surfaces prior to painting, and it occurred to me that that was precisely what I was trying to achieve with my apparently permanently gunked windscreen.

Wikipedia describes it thus:

Sugar soap as typically found in Commonwealth countries is a cleaning material of variable composition sold for use on surfaces affected by greasy or tarry deposits which are not easily removed with routine domestic cleaning materials. When in dry powder form it looks like table sugar thus causing the name.

The solution is alkaline and its uses include cleaning paintwork in preparation for repainting.

The powder form looks exactly like Clearalex powder, and I suspect that there may be some similarities in chemical composition. But you can get liquid and trigger spray variants of it. The main difference between Clearalex and sugar soap is that the latter is dirt cheap, whereas the former comes at a premium price. You simply make up a bucket of the stuff with warm water and give your windscreen a good going over with a clean rag or sponge.

In the case of my ‘damaged’ windscreen, I soaked some cloths in the solution and gave my windscreen a good scrub. Then I then took the car out for a run in the rain.

Initially, I thought it hadn’t worked. But with each wiper pass the glass was became clearer and clearer. The sugar soap appeared to have softened whatever it was on the glass and it was gradually coming off. When I got back home I soaked the rags again and this time left them covering the windscreen for about half an hour (not forgetting the bit under the wipers). I also cleaned the blades with it. This time the windscreen was absolutely crystal clear.

In conclusion, Sugar Soap is great for one-off cleaning. However, it leaves a nasty  white residue when it dries if you try to include it in normal screen wash.

Traffic Film Remover (TFR)

Not long after all this, I stopped using the Tiger Wash (drive thru) at my local garage and started using a local hand car wash – partly as a result of the garage hiking fuel prices, and partly because the hand car wash also did a damned good vacuum clean of the inside of the car. I was intrigued at how clean they could get the car just using some small hand pumps and a power spray. The next time I was in, I did a bit of snooping around and discovered ‘TFR’ – or ‘traffic film remover’.

After reading up on the subject, I bought some TFR In a nutshell, a 1-2% TFR solution gets all the oil/wax film off a windscreen in one go, and it also seems to also attack the residue I’d been plagued with on my lease cars since that first one that had it, though sugar soap is still best for this.

I use TFR in a small spray bottle to clean my alloys and bodywork in between visits to the hand car wash when I have an upcoming test. It removes brake dust from alloys, as well as summer tree gum and bird crap (especially when the little sods have been eating blackberries and insist on sitting on the telephone wire right above my driveway).

And a final note. You can make your own screenwash using TFR. But be advised this does still leave a slight residue.

Does TFR damage the windscreen?

No.

Does TFR damage paintwork?

If it is the non-caustic type, and if it is used at the manufacturer’s recommended concentration, no. But remember that TFR will remove any wax you have applied, so you will need to re-wax after using it on painted surfaces. However, removing wax is exactly what you want if it’s on your windows, which is ultimately why I use it.

Strongly caustic types – which are cheaper and harsher, and often used to shift several centimetres of crap off the undersides of lorries – could damage painted surfaces if used at high strengths and if left on for too long.

Is there a non-chemical solution?

A reader (from Australia) wrote to me to tell me that he had had success removing that new-windscreen film using Cerium Oxide paste. You can buy it easily from various places (including Amazon) in various forms – powder, paste, or block – and it is specifically used for polishing glass. If you buy it, make sure you get the finest grade possible – ideally, one which is specifically sold for the intended purpose.

Can you put oil on the windscreen to prevent smearing?

Or, as it was put to find the blog, ‘can u put oil on wind screen 2 prfent rain’? NO. It will make it worse.

My windscreen is smearing when it snows

That’s probably a different thing, and not ‘smearing’ at all. When the windscreen wiper rubbers get cold, they also get stiff. As a result, instead of flexing to the windscreen contours and bending forwards and backwards on each stroke of the wiper, they snag and bounce across. They may even not touch parts of the screen properly on the wipe. All of this is often accompanied by a horrible grunting sound, and it leaves behind a trail of water streaks.

Also, if there are remnants of snow on the blades, this can leave a trail of melt water as the blades wipe. You get similar effects if a leaf or small piece of blossom gets stuck on your blades.

I see rain spots after my wipers wipe

Then you’ve got wax or some other coating on your screen. I get it after I’ve been to the car wash, and I remove it using TFR and/or sugar soap.

Don’t forget that the wiper blades must also be cleaned (as well as the space below the blades when they are in their parked position). There’s no point cleaning the glass of wax if the rubber still has it on it. The wipers will put the wax back as soon as you use them.

Video Doorbell Project #1 – Overview

Update: I’ve had a rethink on this and won’t be trying to build an entire system after all. After playing around with CCTV cameras I have realised they can do most of the work already.

Update (2023): As a result of fairly frequent issues with the Ring not recording video, recording blank video, or dropping off the network altogether (requiring troubleshooting and rebooting) – which has caused me to miss several callers and deliveries – the final straw came with Ring’s discontinuation of the desktop app. I have switched to the Reolink PoE Doorbell as of mid-2023.

A few years ago I bought a Ring video doorbell. After a bit of fiddling setting it up, it has worked reasonably well, though it isn’t perfect.

For a start off, it relies on Wi-Fi, which is a bloody nightmare at the best of times in the home environment. It is also totally dependant on Ring’s own cloud system (it isn’t an ONVIF camera, which I will go into later). But my main niggle is that I have no control over my data – and Ring is trying to make access to it even more difficult, thus enhancing the imperfections.

You see, the Ring system can currently be accessed via a desktop app, a smartphone app, or via a browser. I use the desktop app to monitor my system, because I can see absolutely no point in having a HD camera and only viewing it on a small smartphone screen. Furthermore, the smartphone app has a tendency to alert you up to a minute or more after an event has been triggered (I often get in my car and drive off from my house, only to have my phone vibrate when I get to the end of the road informing me I left a short while ago). And the browser interface has two-factor authentication and logs you out every five minutes, so if you get an alert, it can take some seconds to log in, by which time whoever was at the door has left. The desktop app is always connected (albeit with a tendency to decide not to give a live feed after it has been triggered). And another niggle is that the system only records several seconds of footage when an event occurs – it doesn’t record continuously.

But a couple of months ago, Ring unilaterally announced it was discontinuing the desktop app – initially, in mid-October, and currently (following uproar across the community), in December.

As I said, the Ring doorbell and the Ring system are not perfect. It can be glitchy, and it could do things better (like record continuously). But it’s a million times better than just ‘ding-dong’’ when someone calls, especially when that someone knocks instead (which most seem to do). However, without the desktop app, the glitchiness factor increases in significance considerably – the variable time lags with the other two methods are simply not acceptable. And as the Ring is a subscription device, I was rather miffed at this drastic change.

Running in parallel with all this is a very relevant separate story. During the summer I installed a birdbox with a camera in it in my garden. Once I’d assembled it and powered it up, it was immediately visible on my home network. That’s because it is an IP camera, and it uses the ONVIF protocol (as I mentioned at the start, Ring doesn’t do that, and forces you to use its own cloud service). Being ONVIF also means I can stream the camera feed live. Admittedly, my birdbox camera is a Wi-Fi system in this case (it’s at the end of the garden, after all), but ONVIF cameras can be wireless or wired – it doesn’t matter, and they just have to be discoverable on your network, which the ONVIF protocol takes care of. Better still, with my NAS system – which has Surveillance Station software pre-installed – I can continuously record the footage. Obviously, there’s no point saving every minute of every day forever, so I have it set to automatically delete anything older than (in my case) two days. This gives me time to manually save any particular footage I want to keep. It has motion detection, and I can edit the zones I want to monitor (and edit detection sensitivity as necessary). And best of all, all the data belong to me, and they are free – no subscriptions of any kind.

You can probably see where this is heading. On the one hand, you have the Ring doorbell – which taps into your network, but which has to communicate with Ring’s own ring-fenced servers across the internet, and those have to communicate back across the internet (or by SMS) to send any messages. It doesn’t record continuously, and no internet (or no Ring cloud) means no functioning doorbell. On the other hand, you have an ONVIF camera, which doesn’t require an internet connection, just a local network, which records continuously, and which has virtually the same overall functionality as far as the camera is concerned (just not a bell push feature).

I mean, come on! Is there a DIY project here or what?

I discovered that you can build an ONVIF camera using the Raspberry Pi. You can get open source motion detection software specifically for the Pi (though my Surveillance Station software already has that). And you can include various event detection features – button presses, for example – in a multitude of different ways.

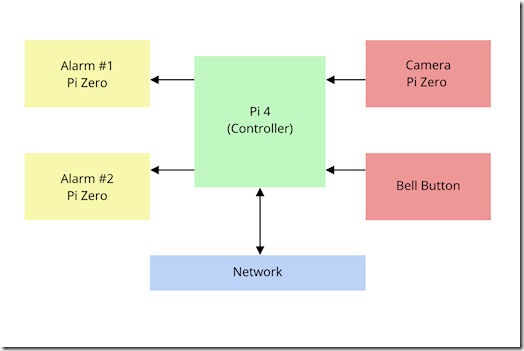
The schematic diagram at the top of this article shows what I am planning right now. I will have a camera system based on a Raspberry Pi Zero with a bell-push button on the outside of my front door. This will connect to a hub, based on a Raspberry Pi 4, on the inside of the door (most likely, by a wired connection through the door jamb, but with Wi-Fi as a back up for the short distance of a couple of inches if necessary). The Pi 4 will be on the network, and almost certainly wired. Finally, I want two remote alarm units (one upstairs, and one downstairs), and I haven’t decided yet whether these will be wired or wireless – a lot comes down to how prepared I am to lay network cables, and the routes I could take if I did. I also haven’t decided whether to control them from the Pi4 or via the network. These remote alarms will be audio-visual – they will chime and flash.

If anyone is thinking I will end up with something the size of a fridge on my front door, just bear in mind the Pi Zero is 30mm x 65mm x 13mm in size. Camera modules are smaller, though the lens adds height. What I have in mind will certainly look different to a Ring doorbell, but it will be of a similar overall size if I assemble it  in an appropriate way. And a Pi 4 is only 57mm x 86mm x 11mm, so it will hardly be out of place if suitably enclosed behind the door.

This will be fun. Watch this space…

Coming Soon – BirdCam Live Feed

The empty bird box at nightI have a new toy. A birdbox with a camera fitted into it. I will be installing it outside over the next few weeks, and maybe I’ll get some roosting birds in the autumn and winter, but I’m hoping to get them nesting next year.

The plan is to get Blue Tits nesting in my box. If that works, I intend to get another box and entice our Robin, who is tame enough to fly against you if you’re out gardening to let you know he or she is there so you can feed him/her mealworms (he won’t take them from your hand just yet, but he’s getting close on that). The birdbox I bought is from Green Feathers. They also supply their kits through Amazon. I chose the deluxe kit, which includes the birdbox, Wi-Fi HD camera, and all the necessary accessories. I also bought the daylight LED lamp to illuminate the inside of the box.

It comes with excellent instructions, and is easy to assemble as long as you can use a screwdriver (and perhaps an awl or small drill), and it connects to the Green Feathers app equally easily. I had it running with a live feed to the app within a few  minutes. For most people, that’s really all they need. The app tells you when any birds visit (motion detection). The camera also has a microphone, so you’ll be able to hear any sounds the birds make. The LED lamp (optional extra) uses a sensor to detect daylight, and turns on during the day to give a true colour feed. At night, the LEDs turn off automatically, and the camera records in infrared (black and white). You can record the video stream and save it through the app, and you can also take snapshots. For most people, the birdbox and app are all that is required. But me being me, that wasn’t enough.

I am not a ‘millennial’, but I am computer literate (I have been building and repairing them for over 20 years). I cannot see the attraction of doing everything on your smartphone when you have a PC in front of you. Fine, getting a live feed of the birdbox to your phone is pretty cool, but this is a HD camera we’re talking about, and there is no way on God’s green earth that you can get a decent HD image on a smartphone. They’re just too damned small – especially iPhones, which most millennials seem to want to own at all costs.

So, once the system was running on the app, the next thing I did was download ONVIF Device Manager (Green Feathers cameras are ONVIF devices). It is a network video client, which means it can access and manage as many ONVIF devices you like. On running it for the first time, it immediately saw my BirdCam, and I was able to view the video live feed on my PC.

Then, I turned to my Synology NAS, and set up Surveillance Station. Now I know most people won’t have a NAS, but I do. Surveillance Station is software on the Synology NAS which monitors multiple video feeds, and allows recording and playback. It is mainly intended for security cameras, but it will work with any IP Camera (which Green Feathers cameras are). It, too, picked up my BirdCam immediately.

Note that ONVIF Device Manager and Surveillance Station are completely independent of each other, and have little if anything to do with what I wanted to do next (ONVIF did help me identify my video feed address). ONVIF Device Manager was simply playing around (and understanding what was happening), and Surveillance Station would provide an alternative if what I did want to do next turned out to be difficult or prohibitively expensive.

My main aim was to be able to put a live feed of my BirdCam on the blog.

I’ve not done anything like this before, though I knew it was possible. But how? My first thought was that I could provide the feed directly from my computer, but my internet provider might not be happy (or capable of it) if I tried to do it through my router, and my router might not be happy if more than a couple of people tried to view the feed at the same time. It was clear that I needed a media server service, where I provided a single feed, and the server managed the necessary bandwidth and distributed it to others.

To that end, after some searching – and being put off by silly prices – I came across ipcamlive, who do just what I wanted. I’d got this far on my own, but I have to admit I needed to contact their technical support a couple of times to get it working. However, thanks to them, I can now be certain that I can do a blog page with a live BirdCam feed on it.

Right now, all I have to do is bolt the bird box to the shed and I’m set to go. And hope that some Blue Tits like the location enough to set up home next spring.

Make Your Own Hand Sanitizer

DIY hand sanitizer ingredientsAs people will no doubt have found out, those members of our society who don’t wash their hands even after they’ve had a shit have been resolutely buying crates of hand sanitizer and thus preventing those of us for whom it might have some benefit getting any of it. In some cases, they’re selling it on eBay for stupid prices.

It’s actually quite easy to make your own. For hand sanitizer to sanitize, it needs to contain at least 60% alcohol. Vodka has been touted across the internet as a suitable makeshift option, but normal vodka is only about 40% alcohol, and it simply doesn’t work. You can get some spirits which are 96% alcohol (which people have died from by drinking it neat), but anyone who is stupid enough to pay how much they cost in the first place puts themselves on this year’s list of Darwin Awards candidates immediately. It would be cheaper to pay the extortionate prices for a faeces-covered rip-off on eBay, being sold by ‘stevethetwat99’ in Manchester (made up name, by the way).

You can use ethanol or isopropyl alcohol (IPA) as your sanitizer base. IPA is often also called ‘rubbing alcohol’, though the great unwashed appear to have latched on to it and have cleared out most stocks of that.

I use ethanol – to be specific, bioethanol – which is used as a fuel for stoves and such. I always have a supply because it’s what I use in my homemade screen wash as the antifreeze element.

You need the following:

  • a suitable plastic bottle
  • bioethanol or neat IPA
  • Aloe Vera Gel
  • Tea Tree Oil
  • Lavender Oil

I used a 250ml plastic bottle with a flip-top lid intended for hand creams (don’t ask why I have any of these in the first place).

Calibrate the bottle first. Pour in exactly 175mls (or grammes) of water. Mark the level with a felt-tip pen. Now add another 75mls (or 75 grammes) of water and mark that level, too. Empty the water away and shake any drips out.

Now you can make the sanitizer. Fill the bottle to the first mark with your alcohol. Then fill it to the second mark with Aloe Vera Gel. Add a few drops of the two oils (up to 10-15 of each, though neither is essential, and you can use anything you like the smell of as long as it’s only a few drops), then screw on the lid and shake well. It takes a while for the gel to disperse, but once it has your sanitizer is ready to use. This version contains 70% by volume of alcohol.

Be careful if you buy ‘rubbing alcohol’ as it is often already diluted to 70% and adding anything else will stop it sanitizing properly. It’s best to buy neat IPA, which is usually freely available as a cleaner.

Welding Isn’t Easy!

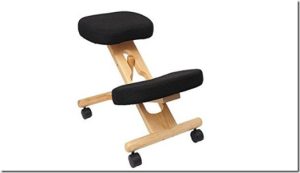
Cheap wooden kneeling chairAs well as being a driving instructor I also do a lot of work on my computer (websites, programming, and so on). So being comfortable is very important.

I’ve used all sorts of chairs over the years, and ones with arm rests or which tilt drive me nuts. I’d much rather sit up straight. So for some years now I have been using one of those ergonomic kneeling chairs, as shown in the photo above. I find them very comfortable and versatile, but the ones I purchased have all had serious quality issues. It’s not surprising when you consider that the most expensive ones can cost upwards of £1,000. Spending around £50, like I did, was bound to raise questions.

The first two I had were made of wood, In spite of getting them from different suppliers, it was obvious that they all come from the same place of manufacture. They were identical to each other, and they both had the same eventual problem. To start with, no matter how well you assemble them (they’re flat-packed), the screws work lose and they start to squeak. For a while, re-tightening works, but eventually the threads will not grip and the movement gets worse until there is an actual wobble. Eventually – and it doesn’t take that long – the wood splits due to the movement and the chair is unusable. Furthermore, even from first use, it is quite possible for one of the castors to fall off while you’re sitting on it or moving it.

In desperation, the third one I bought was more expensive and made of metal. I thought that a metal chair would be indestructible, but I was very wrong indeed. It was clear that the metal version came from the same original source as the wooden ones. Now, that shouldn’t have necessarily been a problem if the metal box sections used had been sturdy, but they weren’t. To keep costs down, the box section was made from a light gauge of steel, and although it was less flexible than wood, this rigidity meant that stress was concentrated across a very specific area near the seat. After about a year I could detect movement and when I checked, the metal had simply cracked.Fairline arc welder and Black and Decker angle grinder

Anyway, like with most problems I encounter, I started to puzzle over how to get round it. I’d thought about drilling holes and fitting long bolts to act as supports – until I discovered how hard it is to drill holes in mild steel on something that is already assembled. The next thing that occurred to me was welding. I’d never done it before, and my only experience of it was my dad coming home with arc-eye on a regular basis when I was a kid (he was a welder, though admittedly on much bigger things), and I started thinking about hiring a welding machine. But then I found out how small and cheap they are. I picked one up for £50 from Makro. At the same time I also bought an angle grinder for £20 (more on that in a later article).

I got a couple of lengths of mild steel flat bar from B&Q and set about welding some strengthening spars to my rickety chair. This was quite successful and the repair, albeit temporary, was good.

By this time, I had discovered that welding isn’t easy. Not at first, anyway. Striking an arc is pretty simple, but keeping it is a skill. Welding rods get used up very quickly, and it is easy to get one stuck. Welded metal gets very hot, the heat spreads quite a long way through a metal object. Paint is flammable, even when it’s nowhere near the actual weld.

As a result of this article, I’ve had a few hits from people using the search term ‘welding rod keeps sticking’ or some such. This can happen if you are holding the rod too close to the weld – the current is therefore lower, so I guess the weld is cooler and solidifies more quickly, hence the stuck rod. It is even worse if you’re so close that the rod keeps touching the weld, as this can cause the arc to extinguish – also resulting in a frozen rod. Also make sure you are using the right current setting for the thickness of rod you’re using.

But back to the story. The idea of building an ergonomic kneeling chair from scratch had been running around in my head for some time, and now that I knew how to weld, the idea started jumping up and down as well. I found a company called Metals4u on the Internet, and they will supply any quantity of metal you want, and their prices are very good. So the project was set to get going.

The project summary can be found here.

* Note that Metals4U asked me to remove the direct link to their site. As far as I understand it, as well as getting too big for its boots these days, Google also appears to have outgrown its brain and is penalising companies for links to their websites from “lesser ranked” websites such as mine. Their web address is metals4u dot co dot uk.

Changing a Wheel

I was surprised to hear that some ADIs have never changed a wheel before. How times have changed.Flat tyre

When I first started driving on my own after I passed my test, I couldn’t wait for an excuse to get the jack out and have a go. Mind you, this was back when just about everyone (who was male) did their own brake pads and stuff on the banger they’d managed to scrape enough money together for in order to save it from the knacker’s yard! Nowadays, I drive a leased car which includes all maintenance and “breakdown recovery”, so it’s really only punctures I have to worry about.

I have to confess that for the first few years of being an ADI I used that free recovery option whenever I did get a flat tyre. The reasons for this were that I didn’t want to get dirty, I hate scissor jacks (my dad was once nearly crushed when one gave way when he was under a car), and… well, if you have a dog you don’t do all the barking yourself.

What made me start doing it myself again was the reliability of the recovery company. I am supposed to have priority service, but if that was the case then I’d hate to have been a pleb who didn’t! On the occasions I have actually broken down, they have turned up in less than an hour once. All the other breakdowns have seen me waiting for between 90 minutes and several hours – and we’re talking about breakdowns in the city of Nottingham here, not the middle of the Sahara. Several waits have been in the dark, and one involved a pupil for whom I had to pay for a taxi to get her home as the wait was over two hours. Yet another situation saw a passing breakdown truck from the same company stop and see if he could help as he was just parking up, but who was then refused permission, whereupon I had to wait for at least another hour – only for a third party contractor to arrive! When you call them, you always got that absolutely bullshit recorded message “we are experiencing high call volumes at the moment”. Every time without fail you hear that, and it doesn’t give you any hope at all that they will turn up within a reasonable time frame.Clarke trolley jack

The last straw came when I called them for a flat tyre about 8pm one summer evening about three years ago and no one was answering, even after repeated calls. So I got the jack out and did it myself. Apart from skinning my knuckles a few times on the tarmac (bloody scissor jacks), and losing about 10lbs in sweat, I changed the tyre in less than 30 minutes.

Next day, I went straight to Machine Mart and bought a Clarke trolley jack (shown above) for about £20. It easily fits in my tool chest in the boot, and I can change a tyre in not much more than 15 minutes without breaking sweat now. I have a torque wrench but my spare tyre is a space saver, so this is academic since I have to get the tyre fixed before I can do further lessons anyway.

I don’t waste time showing pupils how to change a wheel (except when a puncture occurs on a lesson). They’re not paying me to teach them how to do that, and in most cases they have no inclination whatsoever to try it. I would demonstrate it if anyone ever requested it, but no one ever has. However, I do tell them how easy it is, and explain the basics. I also advise them to buy a trolley jack!

Colder And Colder

My last lesson tonight cancelled due to being unwell, so I finished early. It was actually quite useful, because on Friday the central heating packed in and a plumber is coming out tomorrow now we know it is the the boiler (Ouch! £££) and not the pump.

Very ColdAs I mentioned in the previous post, it was -9ºC again this morning. It never got higher than -2ºC all day (so much for the forecast high of 1ºC) and that was with full sunshine throughout.
At 3.30pm I frantically started looking around for a heater. Maplin do quartz halogen heaters, but they had sold out and had 1,000 on back order, but all were spoken for. Machine Mart had sold out. So had B&Q – although they did have some basic quartz heaters, which are just as effective (so I bought one: only cost £20).

Just as well, really. By 3.50pm the temperature was -6ºC.

Flyscreens (Update)

I wrote about this a year or so ago, but one of the best things I ever bought was a set a flyscreens from www.flyscreensuk.co.uk (tel. 01628 481919).

Hinged Flyscreen

I used to have major problems every year with my computer attracting all kinds of winged nasties – huge moths, daddy long legs, every gnat and midge in a 2 mile radius. It still does, of course, except that they cannot get through the flyscreens!

I’m not lying when I say that last summer I did not have a single bug get through – and that includes those thunder flies (thrips) you get every year (tiny little black things).

I received a mail-out today, and Window Screens UK (the name of the company in question) has opened a new showroom so you can see what the products actually look like. They’ve revamped their website, and introduced some new products (including ready-to-fit roller blind screens and spares/accessories for the whole range).

I honestly don’t know why I put up with the problem for so long, before wondering if it were possible to get flyscreens in the UK. They are, after all, very common elsewhere in the world – particularly America.

The screens I bought were self-assembly (very easy), and they fit over my window cavities using continuous magnetic strips. I really do recommend them to anyone sick of flies getting in the house.

How To Build A Kneeling Chair

My project to build an ergonomic kneeling chair has been one of the most popular items on the blog. This page is a summary to identify the various separate articles involved in the project.

Note that this kneeling chair is made out of metal, not wood. The finished article is absolutely bomb-proof.

The separate articles are listed below:

  1. Welding Isn’t Easy! (Introduction)
  2. Project #1
  3. Project #1 (Update)
  4. Project #2
  5. Project #3
  6. Project #3 (Update)
  7. Project #4

Follow each stage in sequence.

Someone asked me what size bolts I used. I didn’t include that information in my drawings – I think I assumed that the diameter of the holes was enough, but I should have explained more clearly. In fact, the bolt size doesn’t matter as long as you don’t make your holes so large that the structure is weakened, or use such small bolts that these themselves become the weak point. Mine were two sizes – the ones used to link the struts were about 5/16″ (or 8mm); the ones elsewhere were about 3/16″ (or 4.5mm). I bought them online.

Someone else asked if the drawings could be used to make the chair out of wood using 2x2s and 2x3s. The short answer is no – because the strain on the part where the struts join the feet would be so great that the assembly would split (and even wooden ones you buy suffer from this problem, which is why I went for metal if you remember the introductory article). I suppose you could modify my plans and develop a functional wooden chair, but that is beyond the scope of this series.

I should also clarify that the kneeling chair I built used three parts left over from the last one I bought: the seat and knee pad panels, and the raising mechanism.

The pad panels are just bean-shaped plywood with threaded mounting holes in them. I re-upholstered them using foam and fabric purchased online (detailed in the articles). However, if you were building one from scratch it would be a simple matter to make your own panels for the seat and knee pads using ¼” or ½” plywood. The raising mechanism  would be a little more of a challenge, but still fairly simple to construct. All it consists of is a threaded shaft inside a corresponding threaded socket. When the shaft is turned the overall length of the socket/thread assembly either increases or decreases. Since the ends of this assembly are fixed to the support struts of the chair, the seat rises or falls as the thread is turned.